As a loyal fan who has waited 20 years for the sequel to "Advanced Warfare," I finally developed a spiritual successor called "Tide Warfare" with the help of AI, a 100% authentic SLG.
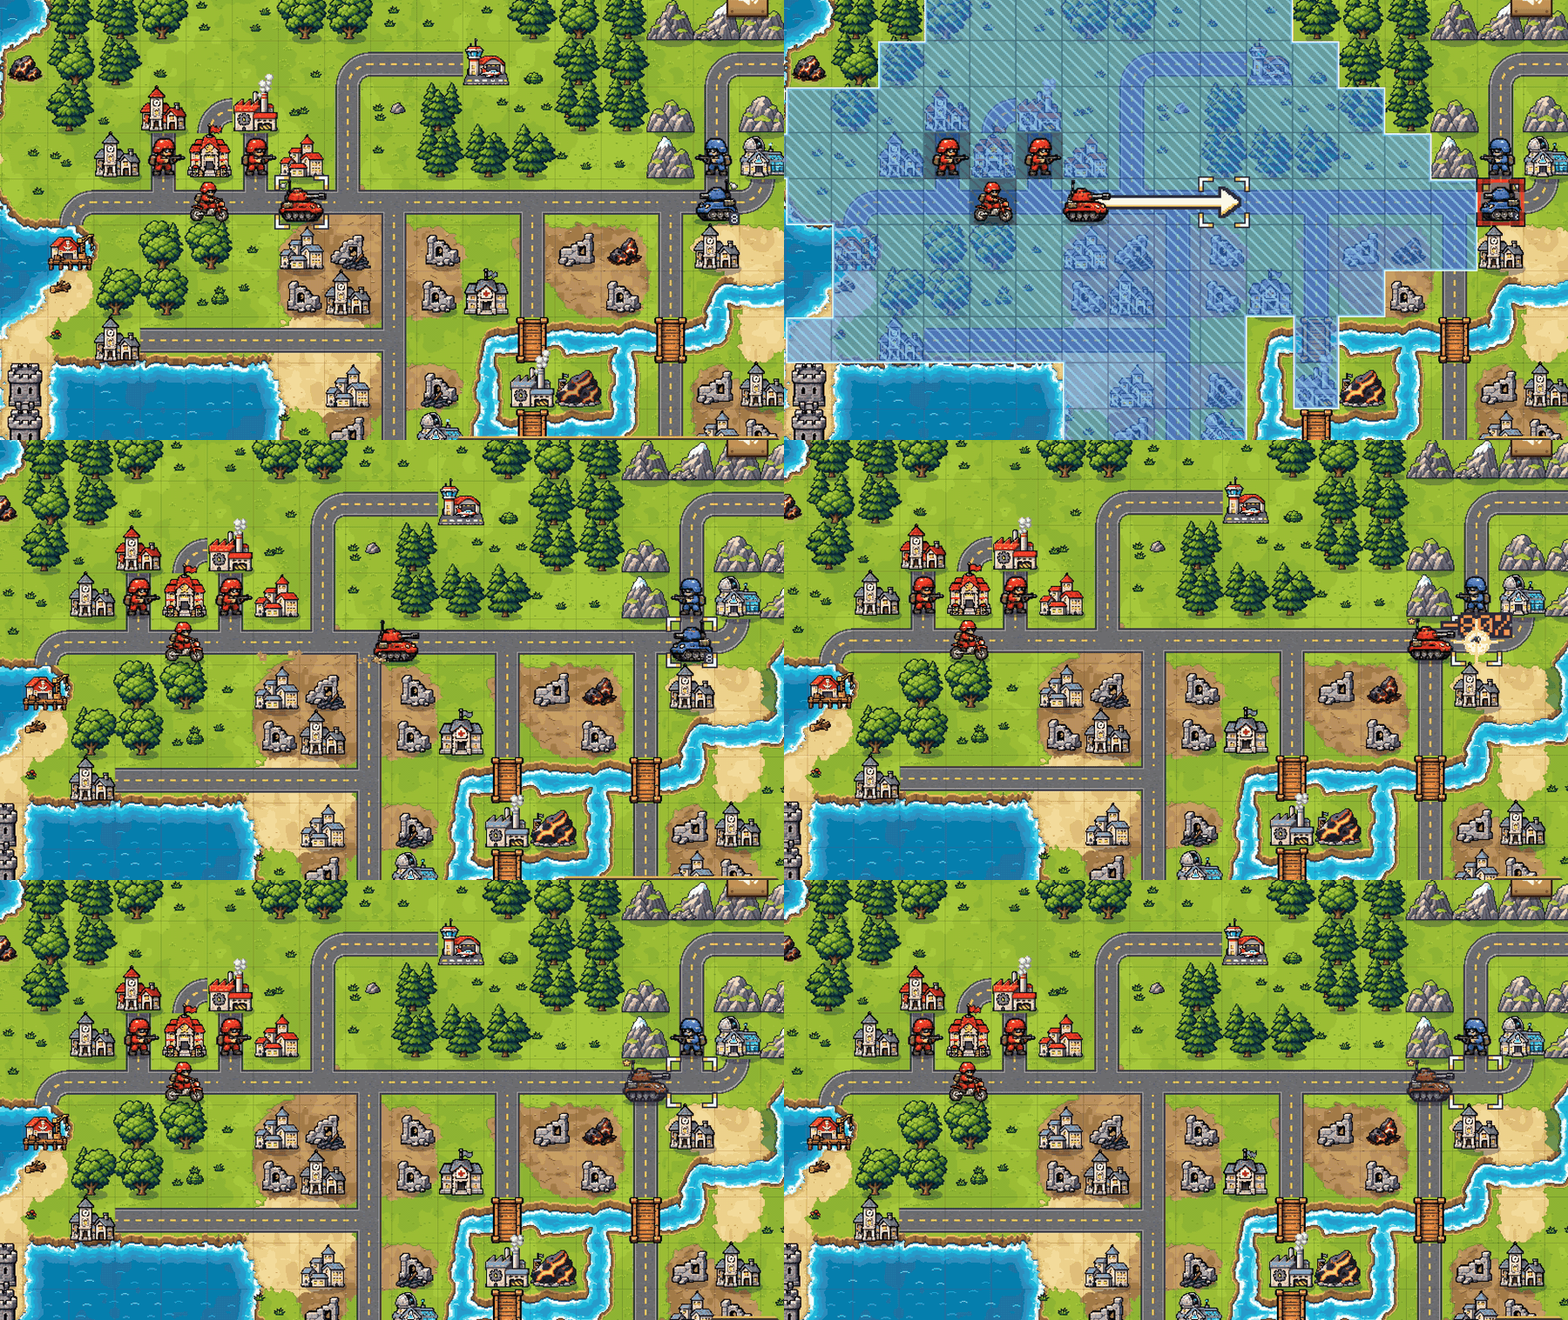
This article is the full version of the "Tide Warfare" game manual, introducing the rules, unit types, commanders, technology, and campaigns of the game.
The game can be played on the web dsh-game-store.com or run after installation from the game store of DeepSeek Harness by installing the plugin dsh-game-store, "Supports custom mods" .

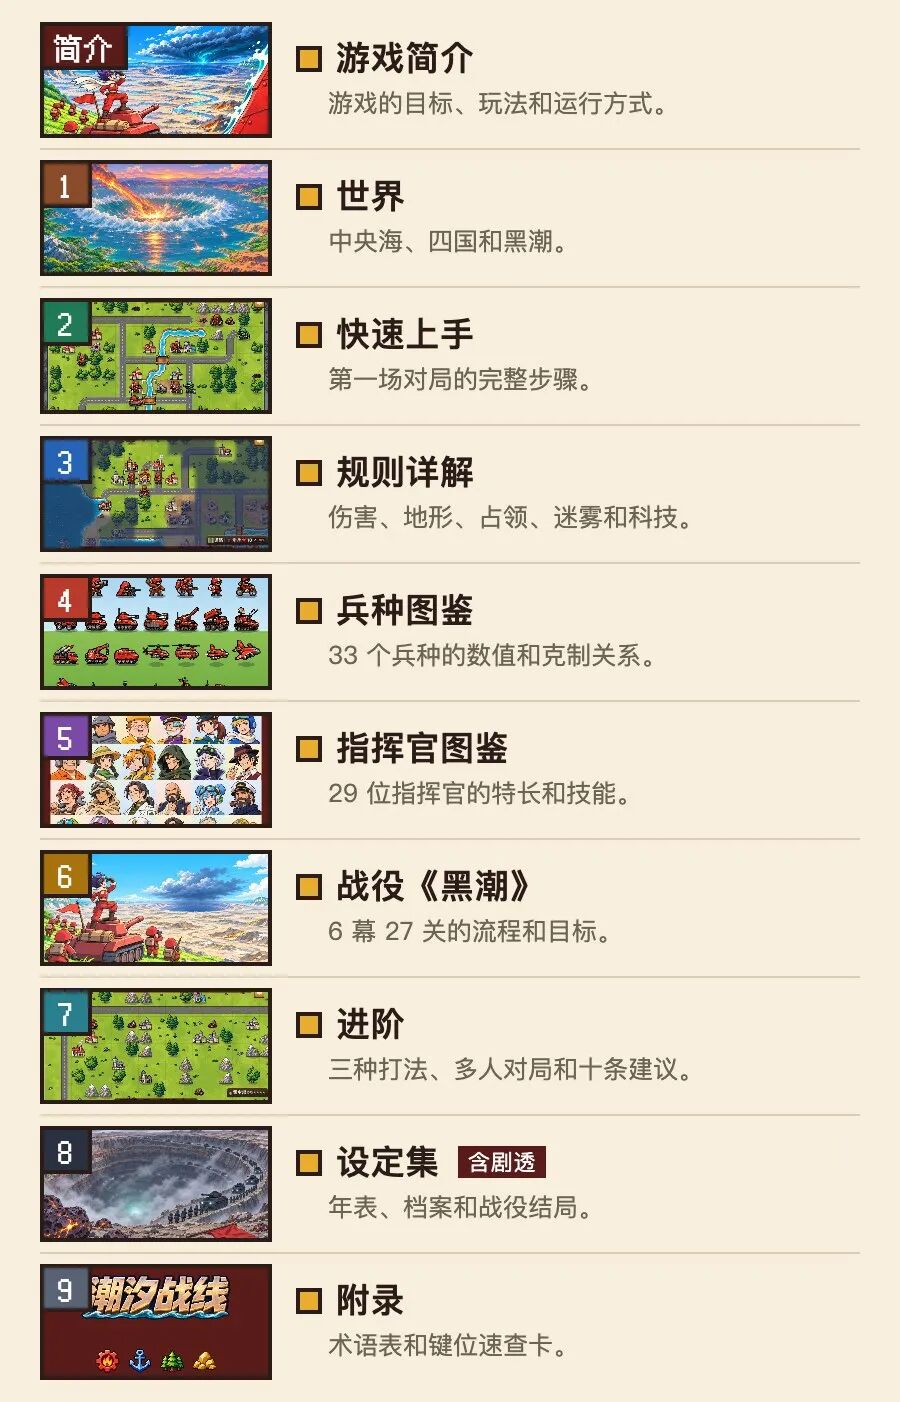
Table of Contents
Game Overview
"Tide Warfare" is a turn-based strategy game involving land, sea, and air. Each faction takes turns on a grid map, winning by capturing the enemy's command center or destroying all enemy units.
Things to do in a game
Use funds to produce units at factories, airports, and ports.
Move and attack: Units have strengths and weaknesses against each other, and terrain affects defense.
Capture buildings: Buildings like cities provide funds each round; the more buildings you capture, the more income you get.
Once the skill bar is full, activate the commander skill.
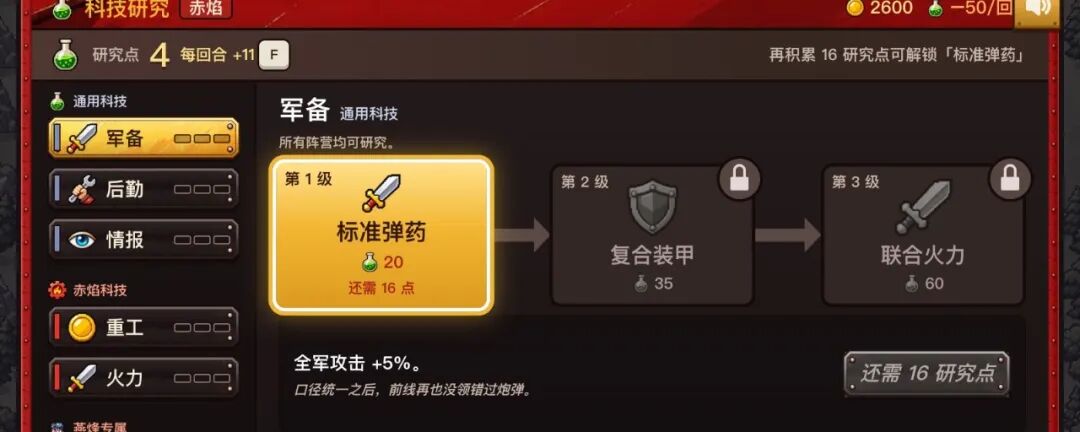
Use research points to unlock technology, and use meteorite fragments to enhance the construction of units.
Gameplay
Campaign: "Black Tide," featuring 6 acts and 27 levels.
Free Match: 24 maps, 2–4 factions, with the option to ally or enable fog of war. You can battle against AI or have several players alternate on the same device.
Where to play: The game runs in a browser, can be played on
dsh-game-store.com, or installed from the DeepSeek Harness game store.Controls: Keyboard, mouse, touchscreen, and gamepad are all supported, and switching is always available.
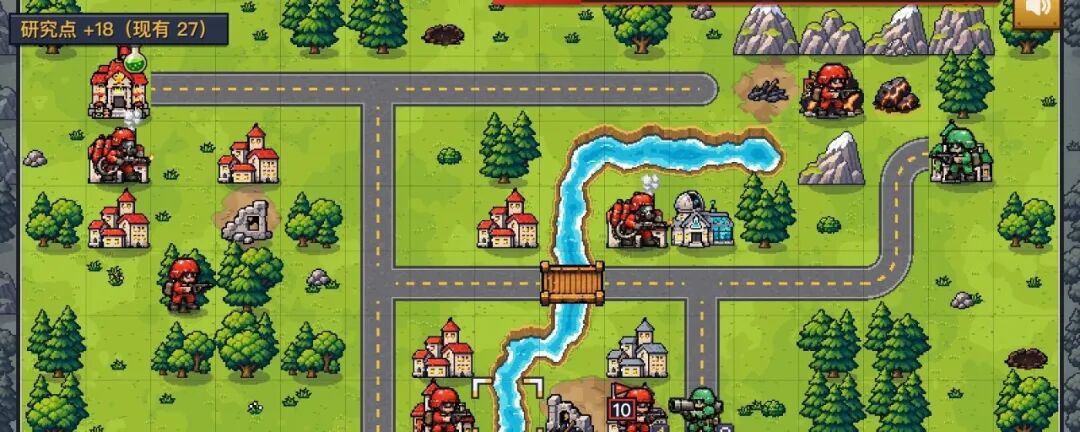
1 Land, Sea, and Air - 33 unit types Infantry units occupy buildings, tanks advance from the front, ranged units attack from the rear, and air and naval units each have units that counter them.
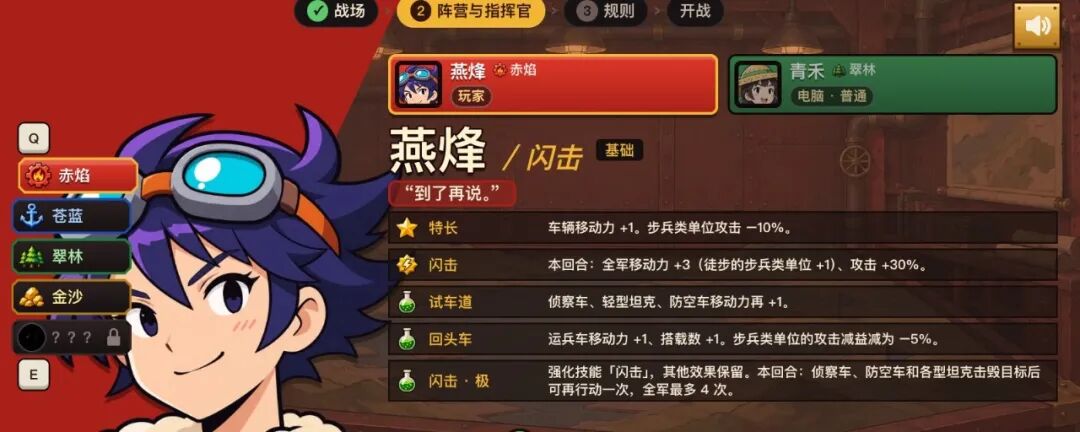
2 29 Commanders Each commander has a unique specialty that is effective from the beginning of the game and a skill that determines the types of units suitable for production in that round.
3 Campaign "Black Tide": 6 Acts and 27 Levels The prologue and first act teach one or two rules each level; after completing them, the main rules have all been introduced.
4 Technology Research and Meteorite Fragments Funds can be exchanged for research points to unlock technology; meteorite fragments are used to enhance constructed units.
Four factions:
Red Flame (North Shore Plateau · Furnace City): An industrial power of steel and factories, believing in firepower and armor.
Azure Blue (East Coast Islands · Twelve Ports): A federation of the ocean and sky, placing importance on technology and logistics.
Emerald Forest (Southwest Mountains · Hundred Villages): Guerrilla people of mountains and snowfields, skilled at terrain and concealment.
Golden Sand (South Shore Sandy Plains · Seven Cities): A city-state alliance of trade routes and gold, fighting with wealth and walls.
Chapter 1 World

Four countries live around an inner sea called the Central Sea. There is a large pit in the center of the Central Sea, called the Eye of the Sea, which was created by a meteorite long ago. Water flows in and out of here.
Central Sea and Eye of the Sea
Every thirty years, the seawater retreats from the Eye of the Sea once. Meteorite fragments emerge from the seabed, and the four countries have a battle over it each time.
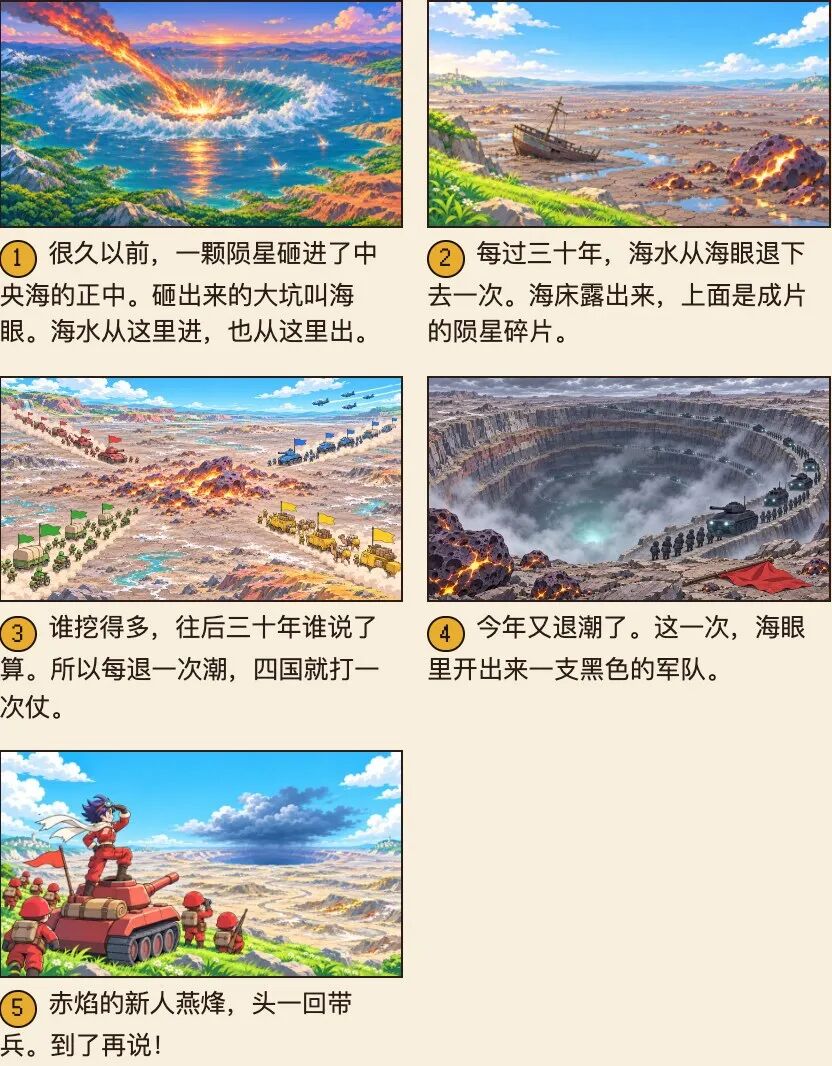
This army is called the Black Tide; its origins and purpose are described in the last section of this chapter, "Black Tide."
Low Tide occurs every thirty years, when the seawater drains from the Eye of the Sea, revealing the seabed of the Central Sea. After a few years, the water rises again from the Eye of the Sea, returning to its original shores. There is a large gate beneath the Eye of the Sea, controlling the flow of seawater. No one knows who built it. The people of the four countries only know that every thirty years, the water leaves; when the time comes, the water returns. If someone completely opens this gate, the rushing water will overflow the shores, drown the cities, and submerge the mountains.
Meteorite Fragments are normally sunk at the bottom of the sea and only surface during low tide. They are dark green and burn ten times brighter than coal, producing steel that is both lightweight and tough. The furnaces, ships, planes, and trade caravans of the four countries rely on them. They only surface during low tide, so every low tide, the four countries must dig up enough to last the next thirty years. There are only so many fragments. The four countries are neighbors year after year, but every thirty years they become enemies.
Relationship to Matches Meteorite fragments are the second type of resource in matches: capturing meteorite mines, picking up fragment piles, and destroying enemy enhanced units can yield them for strengthening construction (see Chapter 3). The Eye of the Sea and the Big Gate beneath it are the endpoints of the campaign.
World Map
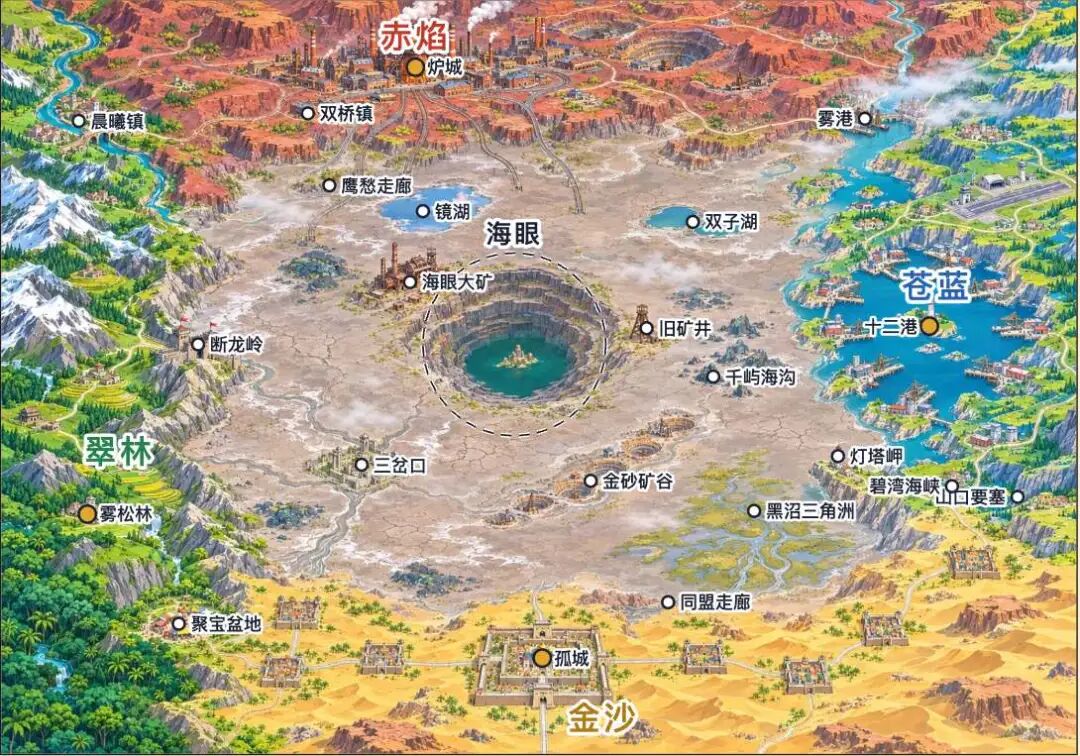
Red Flame (North Shore Plateau · Furnace City): An industrial country on the North Shore Plateau, the capital Furnace City has 140 furnaces.
Azure Blue (East Coast Islands · Twelve Ports): A federation formed by the twelve ports of the East Coast Islands.
Emerald Forest (Southwest Mountains · Hundred Villages): Over a hundred villages in the Southwest Mountains.
Golden Sand (South Shore Sandy Plains · Seven Cities): Seven shopping malls on the South Shore Sandy Plains.
Main Bases The campaign levels are set at these bases; gold dots represent the capitals and territories of the four countries.
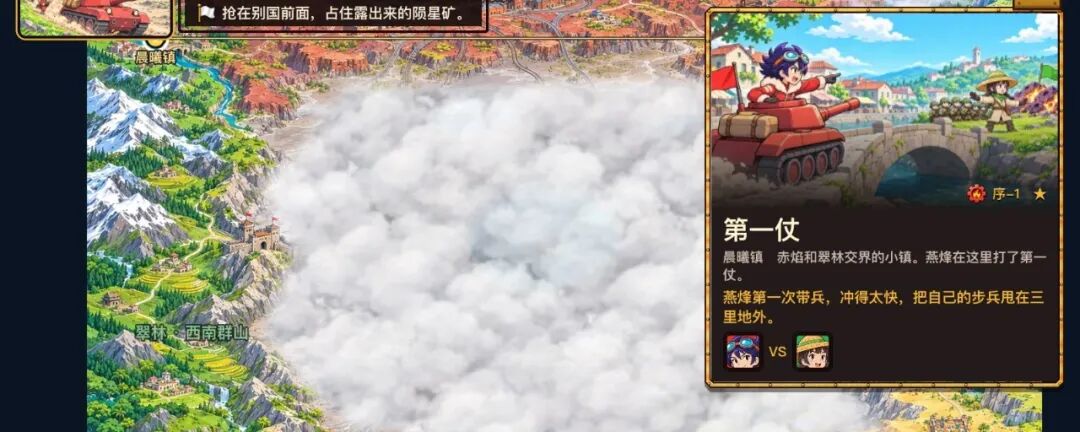
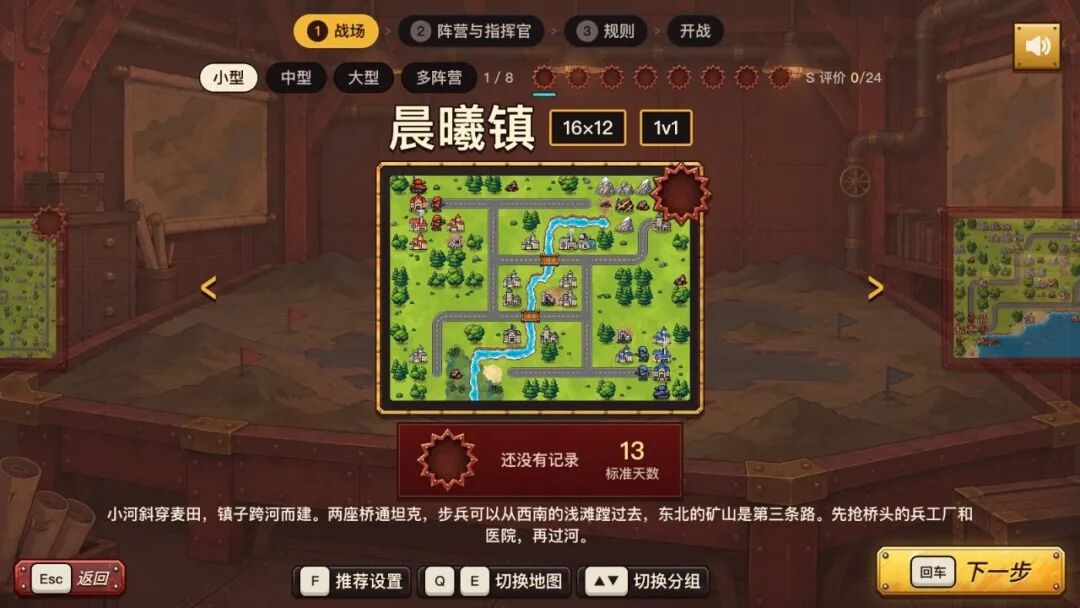
Dawn Town: A small town at the junction of Red Flame and Emerald Forest. Yan Feng fought the first battle here.
Lighthouse Cape: A cape in the southeast corner of the seabed. Yan Feng and Cang Lan reached a draw here.
Double Bridge Town: Two bridges. Only after crossing the bridge can you access the road to the seabed.
Eagle's Cry Corridor: A mountain road on the seabed, guarded by two radar towers.
Fog Port: A port where Red Flame and Azure Blue face off across the river, often shrouded in fog.
Golden Sand Mine Valley: A dry river valley on the southern slope of the seabed, where five meteorite mines line up.
Big Mine of the Eye of Sea: The largest meteorite mine next to the Eye of the Sea.
Black Marsh Delta: A swamp within the Azure Blue realm. The remnants of Yan Feng are trapped here.
Mountain Fortress: The gateway to Azure Blue, featuring an airport.
Thousand Islands Trench: The area east of the Eye of the Sea where the water hasn’t fully drained.
Twelve Ports: The home of Azure Blue, with twelve ports surrounding an inner sea.
Gemini Lake: Two lakes surrounded by a canal town.
Treasure Basin: The market of Emerald Forest. Yan Feng had three bowls of new rice here.
Fog Pine Forest: The old forest in the heart of Emerald Forest, featuring five villages.
Dragon's Break Ridge: The mountain pass into Emerald Forest.
Three-Way Confluence: An ancient city where three rivers converge, equipped with a radio station accessible to all four countries.
Old Mine: An abandoned mine on the seabed.
Mirror Lake: A remnant lake on the northern slope of the seabed, with a research institute on the northern shore.
Alliance Corridor: The main road for transporting goods by Golden Sand.
Green Bay Strait: The outlet for Golden Sand to the sea.
Lonely City: One of the seven cities of Golden Sand. The person guarding the city is the most stubborn in all of Golden Sand.
Furnace City: The capital of Red Flame, home to Yan Feng.
Overview of the Four Countries
The player gains the faction characteristics, research methods, and two technology lines of the selected commander's faction. The army's color is determined by the seat and is unrelated to the faction characteristics.
Red Flame North Shore Plateau · Furnace City
Overview: An industrial stronghold of iron and factories, believing in firepower and armor.
Faction Characteristic: Defense of tracked vehicles +5%; Repair costs for land units at factories -20%.
Research Method: Hourly System: Each factory provides 1 extra research point each turn, up to a maximum of 4 points; research funding remains effective even if set to "stop."
Azure Blue East Coast Islands · Twelve Ports
Overview: A federation of the ocean and sky, emphasizing technology and logistics.
Faction Characteristic: Vision of air units and ships +1; Repair costs -20% for air units at airports and ships at ports.
Research Method: Parliamentary Vote: Receive an extra 5 research points each turn (not applied when research funding is set to "stop"). Each funding level increases by +20%.
Emerald Forest Southwest Mountains · Hundred Villages
Overview: Guerrilla people of mountains and snowfields, skilled at utilizing terrain and concealment.
Faction Characteristic: Cost of infantry units -5%; Defense of infantry units located in forests or mountains +10%; Cost of medium tanks, heavy tanks, and rocket artillery +5%.
Research Method: Word of Mouth: All research funding -50%, reduced by 2 research points each turn; if a new building was occupied in the previous round (counting each building only once per game), receive +4 research points this turn.
Golden Sand South Shore Sandy Plains · Seven Cities
Overview: A city-state alliance based on trade routes and gold, fighting with wealth and fortifications.
Faction Characteristic: City income +10%; Defense of units located in buildings +5%, defense of units on plains -5%.
Research Method: Priced: The exclusive "high" bracket of research funding can be selected: Pay 900 funds per turn to obtain 30 research points.
 Infantry and light tanks of each faction
Selection Recommendations
Tank front advancement: Red Flame, represented by commanders Niu Jun (Armor) and Yan Feng (Blitz)
Naval and air units: Azure Blue, represented by commanders Cang Lan (Raging Tide) and Yun Sun (Air Command)
Infantry units, ambush and terrain: Emerald Forest, represented by commanders Qing He (Militia) and Ye Tang (Stealth)
Economics and defense: Golden Sand, represented by commanders Qian Duo Duo (Military Fund) and Shi Gan Dang (Iron Wall)
The Black Tide has receded again this year. This time, a black army has emerged from the Eye of the Sea. This army does not belong to the four countries; it is a unlockable faction. See this chapter's "Black Tide" section for faction characteristics, unlocking conditions, and commanders; exclusive unit types are covered in Chapter 4.
Red Flame
An industrial country on the North Shore Plateau, with 140 furnaces in the capital, Furnace City. There are many tanks and artillery, and the noise is loud. The army of Red Flame is an extension of the factory: each tank must be signed off by the foreman before it leaves the production line. They fight like they’re racing against a deadline, planning to the hour, with firepower measured in tons. Yan Feng is from this factory's test range.
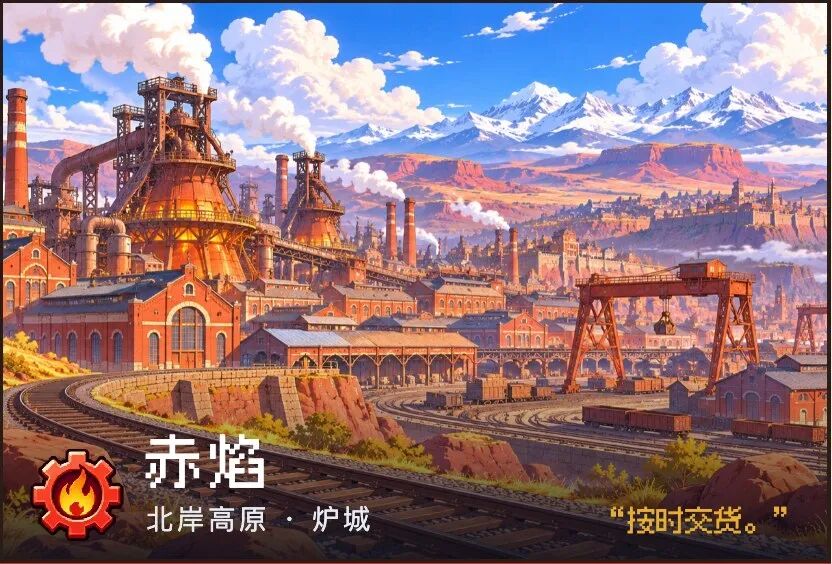
“The furnace waits for no one.” “If it’s signed off, it’s easy to find the person responsible if it breaks.”
Goals: Dig up enough meteorite fragments for thirty years to keep the furnaces burning.
Fears: The furnace goes cold.
Combat Characteristics Suitable for land combat maps with numerous factories: high defense for tracked vehicles, low repair costs for land units at factories, and each factory provides additional research points.
Faction Characteristic: Defense of tracked vehicles +5%; Repair costs for land units at factories -20%.
Research Method: Hourly System: Each factory provides 1 extra research point each turn, maxing at 4 points; research funding remains effective even if set to "stop."
Commanders of Red Flame (Profiles, specialties, and skills can be found in Chapter 5) Yan Feng (Blitz - Basic), Lei Zheng (Artillery - Specialist), Niu Jun (Armor - Specialist), Liu Zhuan (Quick Build - Tactic), Yue Gang (Counterattack - Tactic), Zhu Yan (Flame - Specialist)
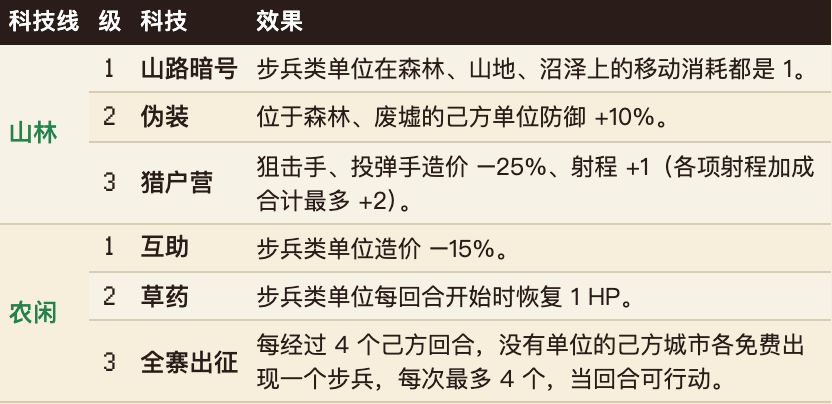
Technology of Red Flame There are 2 technology lines in total, with only one being selectable at level 3. Research rules can be found in Chapter 3.
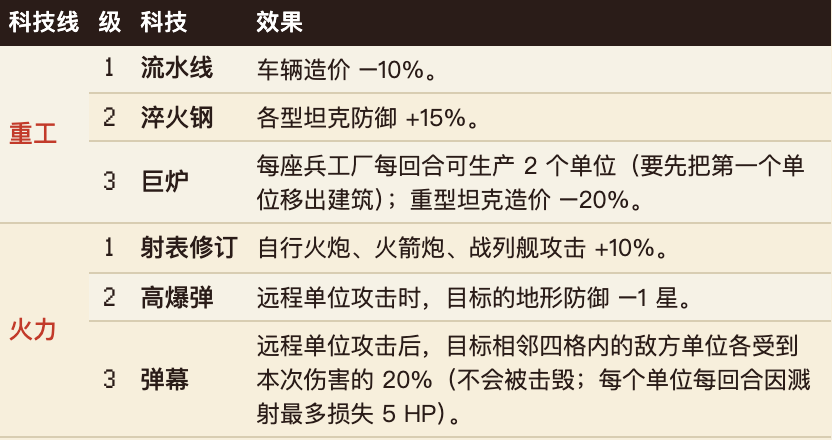
Azure Blue
A federation formed by twelve ports on the East Coast Islands. The ships are excellent, the planes are excellent, and everything is first checked against the weather. Officers of Azure Blue are all trained navigators and meteorologists; orders begin with the wind direction and tide times, and only then who to strike. They feel that Red Flame’s folk are rash, and Red Flame folks think they are slow. The waterway to the Eye of the Sea is in their control.
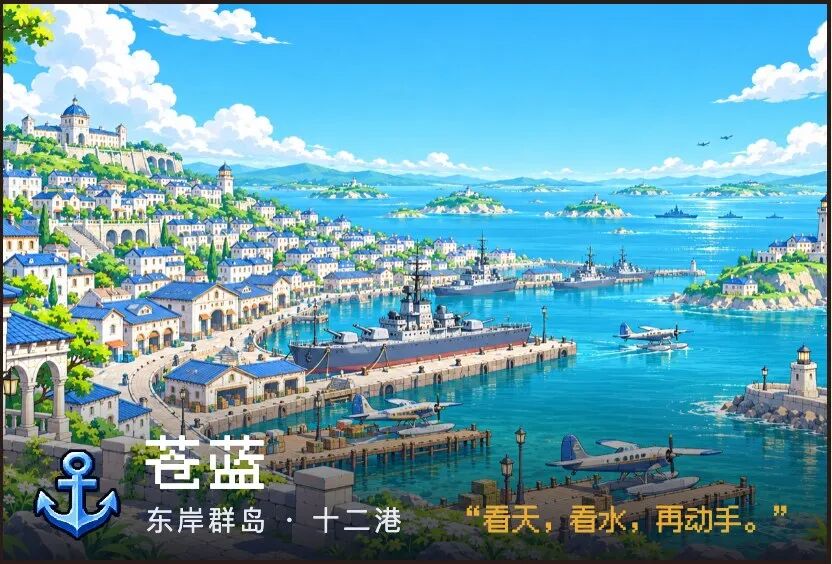
“The tide waits for no ship; ships must wait for the tide.” “When visibility is poor, always stop first.”
Goals: Keep the twelve ports and their ships safe.
Fears: The twelve ports return to their homes.
Combat Characteristics Suitable for maps with oceans and airports: Air units and ships have greater visibility and lower repair costs; receive an extra research point each round.
Faction Characteristic: Vision of air units and ships +1; Repair costs for air units at airports and for ships at ports -20%.
Research Method: Parliamentary Vote: Gain an extra 5 research points each round (not applicable when funding is set to "stop"). Each funding level increases by +20%.
Commanders of Azure Blue (Profiles, specialties, and skills can be found in Chapter 5) Cang Lan (Raging Tide - Specialist), Yun Sun (Air Command - Specialist), Feng Ling (Rotor - Specialist), Ting Lu (Field Medic - Tactic), Ji Yu (Anti-Air - Specialist), Ming Zhou (Submarine - Specialist)
Technology of Azure Blue There are 2 technology lines in total, with only one being selectable at level 3. Research rules can be found in Chapter 3.
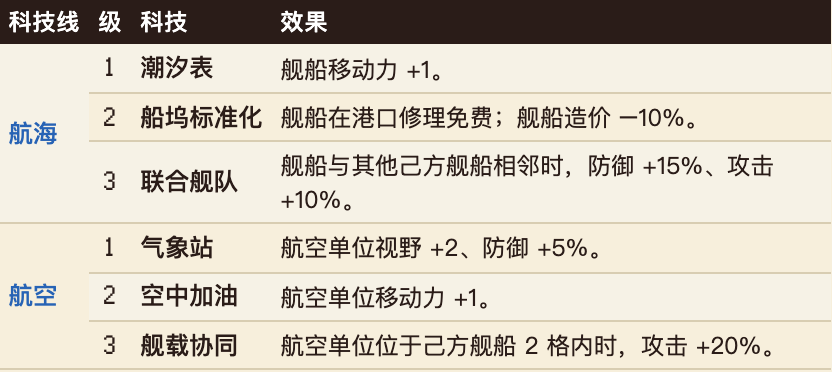
Emerald Forest
More than a hundred villages in the Southwest Mountains. No standing army; they only take up arms during agricultural downtime, and when it’s planting time, people go back automatically. The people in Emerald Forest rely on mountain roads, forests, and familiar faces during battle. The number of units sent from each village is recorded on a wooden sign at the village entrance, and they must match one for one upon return. The mountain roads leading units to the Eye of the Sea are in their control.

“The seedlings wait for no one.” “All who go out must return.”
Goals: Bring everyone back home before it's time to plant.
Fears: Names on the wooden sign don't match.
Combat Characteristics Low cost for infantry units, high defense when in forests or mountains; research funds are halved, and additional research points are gained for capturing new buildings. The costs for medium tanks, heavy tanks, and rocket artillery are higher.
Faction Characteristic: Cost of infantry units -5%; Defense of infantry units in forests or mountains +10%; Cost of medium tanks, heavy tanks, and rocket artillery +5%.
Research Method: Word of Mouth – Research funding is halved; new research points decrease by 2 each turn; if a building was newly occupied in the previous turn (counting each building only once per game), this turn earns +4 research points.
Commanders of Emerald Forest (Profiles, specialties, and skills can be found in Chapter 5) Qing He (Militia - Specialist), Cang Bai (Sniper - Specialist), Ye Tang (Stealth - Tactic), Ye Qing (Guerrilla - Tactic), Xue Shan (Snowfield - Tactic), Ku Tong (Desperate Fight - Tactic)
Technology of Emerald Forest There are 2 technology lines in total, with only one being selectable at level 3. Research rules can be found in Chapter 3.
Golden Sand
Seven shopping malls on the South Shore Sandy Plains. Rich, with thick walls, and the army is hired. The people of Golden Sand calculate everything: how much a tank is worth, how much a city is worth; they don’t fight unfair battles. Only the city walls are built by themselves, and they are very thick. The grain, shells, and military funding needed to fight at the Eye of the Sea are in their hands.
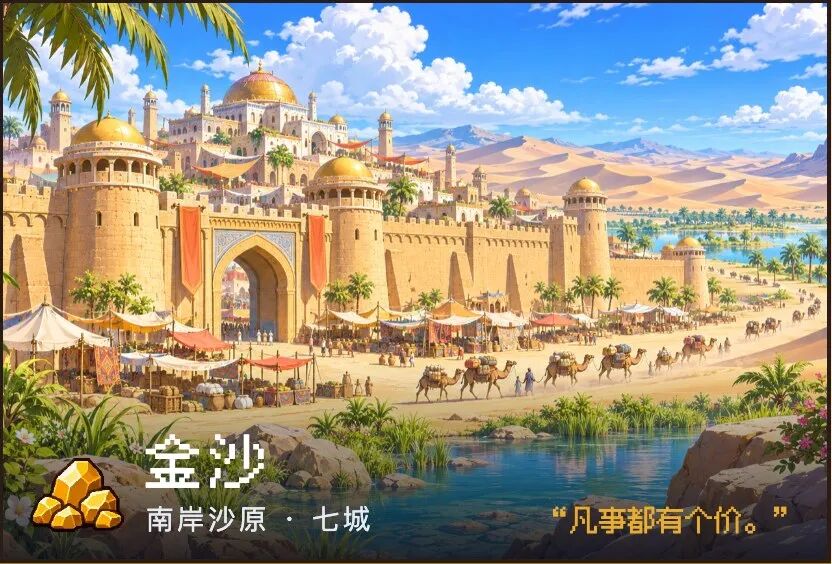
“First look at the goods, then at the person.” “The walls are my own; the soldiers are rented.”
Goals: Balance the accounts and keep the city standing.
Fears: Money becomes worthless.
Combat Characteristics High city income, high unit defense when located in buildings; when funds are sufficient, it is possible to choose the exclusive "high" bracket of research funding. Units in plains have low defense and should avoid battles on plains.
Faction Characteristic: City income +10%; Defense of units in buildings +5%, Defense of units in plains -5%.
Research Method: Priced: The exclusive "high" bracket of research funding can be selected: Pay 900 funds each turn to obtain 30 research points.
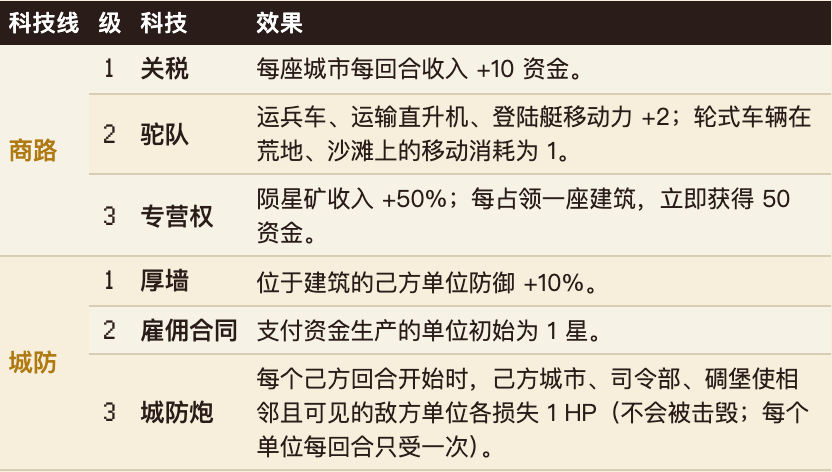
Commanders of Golden Sand (Profiles, specialties, and skills can be found in Chapter 5) Shi Gan Dang (Iron Wall - Basic), Qian Duo Duo (Military Fund - Basic), Jin Bu Huan (Luck - Tactic), Wan Li Xing (Light Cavalry - Specialist), Shang You Yu (Tax Collection - Tactic), Man Ting Fang (Market - Tactic)
Technology of Golden Sand There are 2 technology lines in total, with only one being selectable at level 3. Research rules can be found in Chapter 3.
Black Tide
A black army has emerged from the Eye of the Sea. They intend to fully open the Eye and release the flood to submerge all land. The soldiers of Black Tide are those who have lost their homes in past battles during low tide. The leader Xuan Yuan's reasoning is simple: Each time the tide recedes, there is a battle; as long as there is land, there are borders, and where there are borders, there will be the next battle. There are no borders in the sea. He does not seize meteorite mines, only using the fragments to fuel the opening of the dam. He does not kill indiscriminately, having built a black fleet that accepts anyone willing to board. In his view, this is saving people.
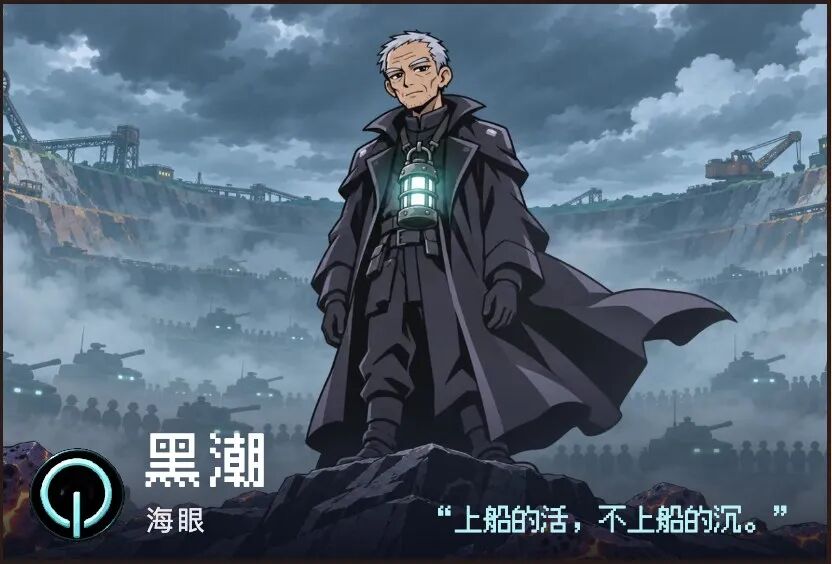
“There are no borders in the sea.” “When the fragments are distributed, you’ll still fight.”
Goals: Open the Eye and leave only the sea in the world.
Fears: The four countries truly unite. If that happens, then his reasoning falls apart.
Emblem: A black background with an incomplete circle, an opening pointing downwards, with a vertical line in the gap (Eye of the Sea and its dam). The accent color is a cold azure blue.
Combat Characteristics Suitable for maps with plenty of wasteland, ruins, and beaches: Units on these tiles have high defense; destroying enemy units grants additional research points.
Faction Characteristic: All military attack +5%; Defense of units located on wasteland, ruins, and beaches +10%; All military vision +1 (effective when fog of war is enabled).
Research Method: Deconstruction: Each unit destroyed awards an additional 2 research points next turn, with a maximum of 6 research points per turn.
Exclusive Units: Armored trains, Black soldiers, Abyssal war vehicles, Tide cannons, Night crows, Submersion ships. Only Black Tide faction can produce these, refer to Chapter 4.
Unlocking Conditions (meet any one): ① Pass any level of a Black Tide commander in the campaign; the earliest level is "Waiting for the Tide" (2-5). ② Defeat the AI once with each of the four factions in free battles, setting the enemy AI to normal or difficult difficulty.
Commanders of Black Tide (One leader and four generals unlock after passing a level in the campaign; profiles, specialties, and skills are found in Chapter 5) Xuan Yuan (Well Master - Tactic), Xuan Shuo (Tidal Calculation - Specialist), Xuan Zhu (Storekeeper - Tactic), Xuan Zhen (Paving - Specialist), Xuan Zhu (Lighting - Tactic)
Technology of Black Tide There is only 1 technology line "Underground," with no exclusive technology lines for commanders. Research rules can be found in Chapter 3.
Level 1 Mine Lamp: All military vision +1.
Level 2 Old Tunnel: Defense of units on wasteland, ruins, and beaches increases by another 10%.
Level 3 Rail Extension: Attack of friendly vehicles +10%.
Chapter 2 Quick Start
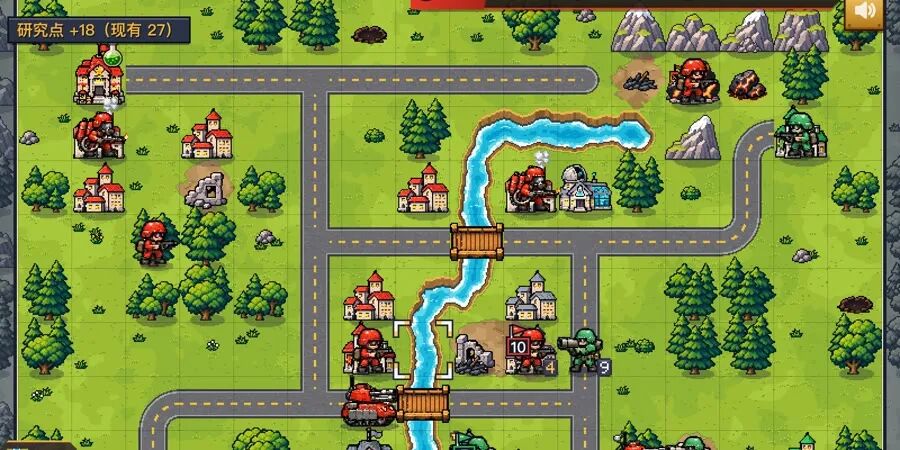
A turn consists of six steps: selecting a unit, moving, capturing, attacking, producing, and ending the turn. Each unit can act once per turn; newly produced units cannot act until the next turn.
Starting a Match
Two entry points: Campaign, Free Match.
Campaign It is recommended to start playing from here; the first few levels of Campaign "Black Tide" also serve as a tutorial: Prologue-1 teaches movement and attack, infantry capturing buildings; Prologue-2 teaches unit production at factories, terrain defense; 1-1 teaches skill slots and skill activation, commander characteristics... Each level teaches one or two content pieces. Once the prologue and first act are completed, the main rules have all been introduced.
Free Match Choose from a selection of 24 maps and opponents, with 2–4 factions. You can battle against AI or set multiple factions as players to alternate on the same device. Follow the steps below to set it up, confirm on the “Matchup” page, and start the battle.
Step 1: Choose Battlefield Maps are divided into four groups: small, medium, large, and multi-faction. It is recommended to select a small map for your first game.
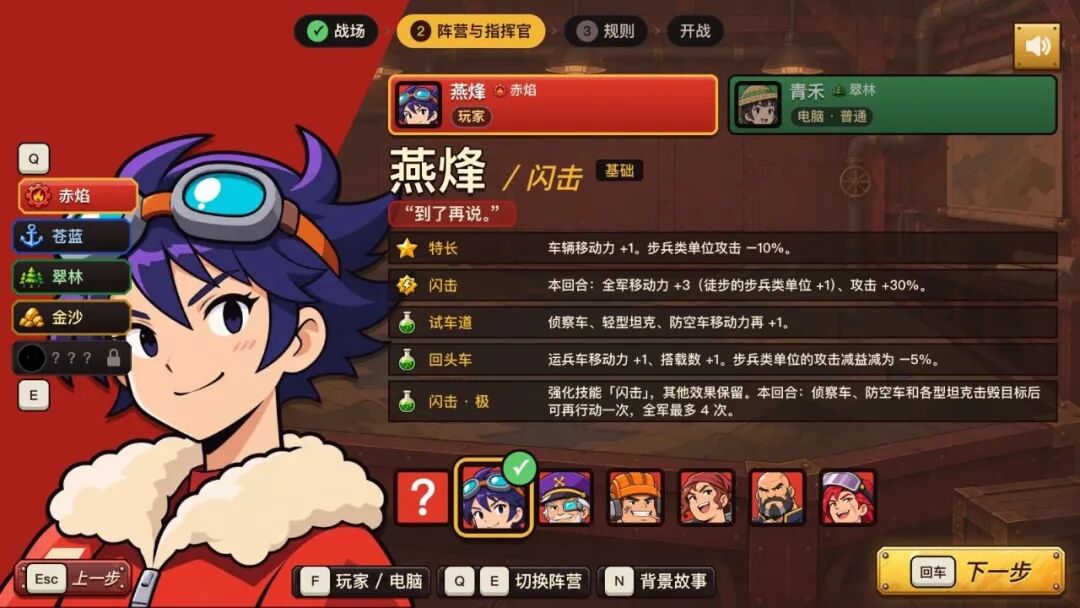
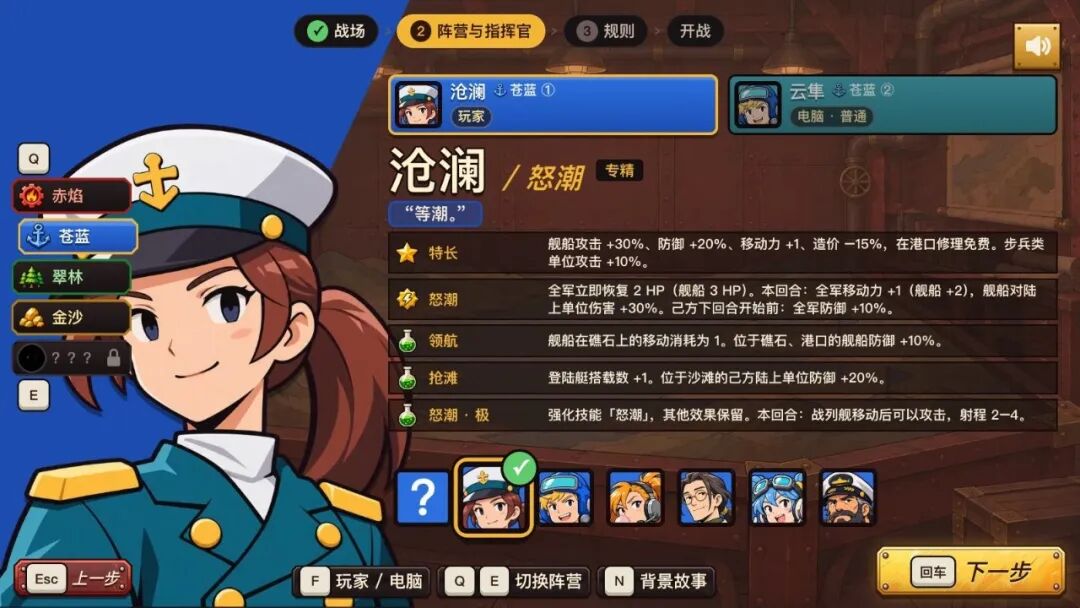
Step 2: Factions and Commanders This page sets the factions participating in the battle and the commanders for each faction. The upper part is the seat card, which can be switched to player or AI; the AI has easy, normal, or hard settings. The left side selects the factions, and the lower part selects the commanders; by pressing the details key, you can view profiles, specialties, and skills.
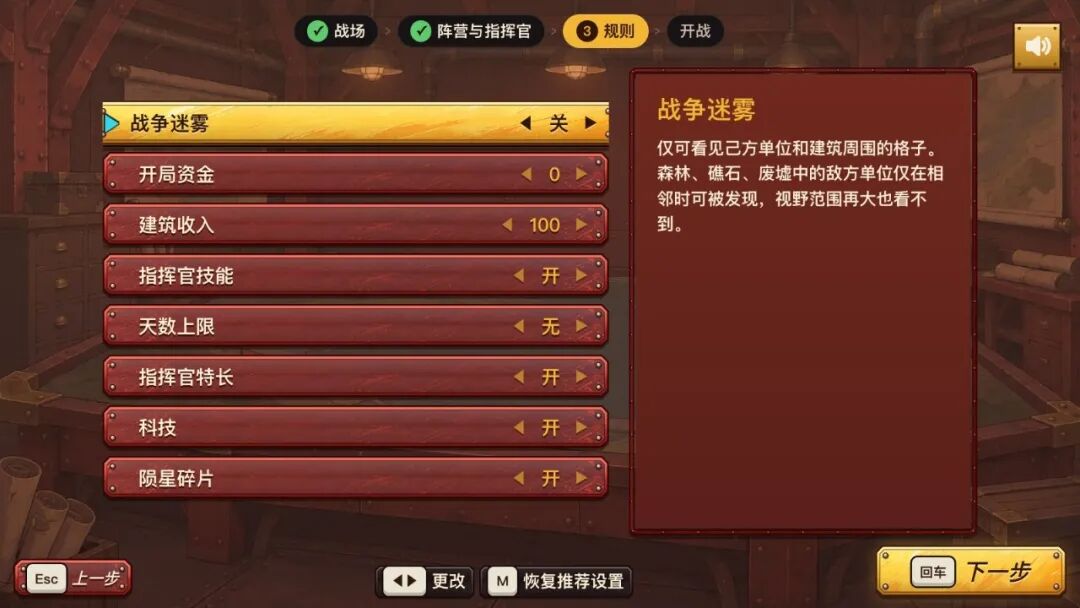
Step 3: Rules Set the game rules regarding fog of war, starting funds, technology, and so on. Use default values if uncertain.
Step 4: Start Battle Confirm both sides' factions and commanders, and press confirm to start the battle.
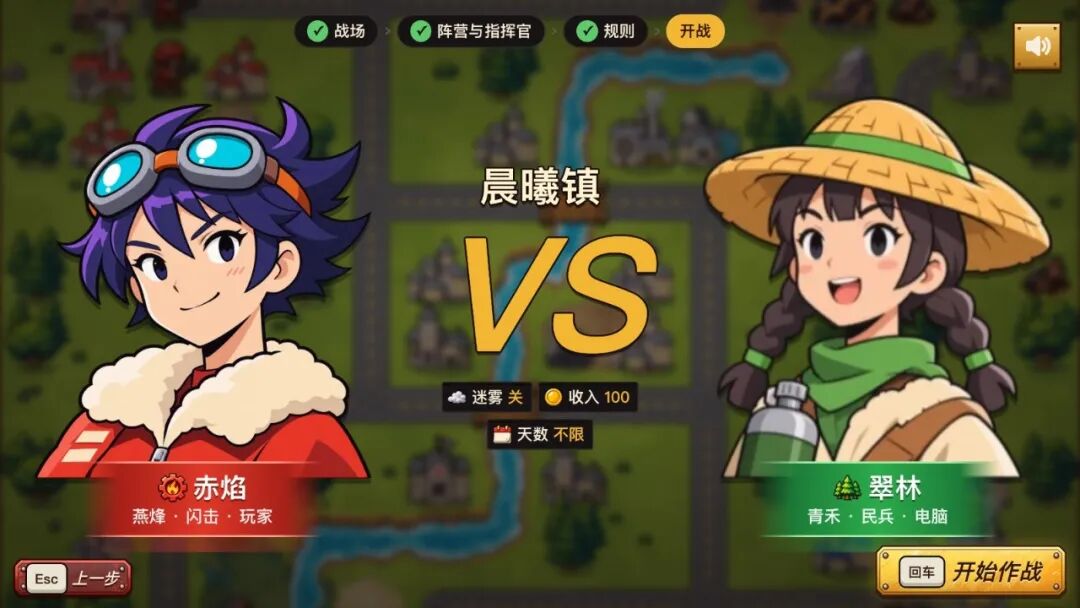
Button Location The gold button at the lower right corner of each page is the main action (gamepad A, keyboard Enter), and the gray button at the lower left corner is return (B, Esc). When using a mouse or touchscreen, click directly on these two buttons. Matches are automatically saved, and when the game is opened again, the title page will have a "Continue" option. The top right corner of the title page and in "Settings" allows language switching; there are a total of 10 languages available.
Same Faction vs. Matchup In free matches, two seats can select commanders from the same faction. In this case, the second seat will change to a secondary color, and the faction name will be followed by ① ② for distinction. The relationship of enemy and ally is determined solely by seats and teams, unrelated to factions or colors: two seats from the same faction that are not on the same team are enemies to each other.
Screen Explanation
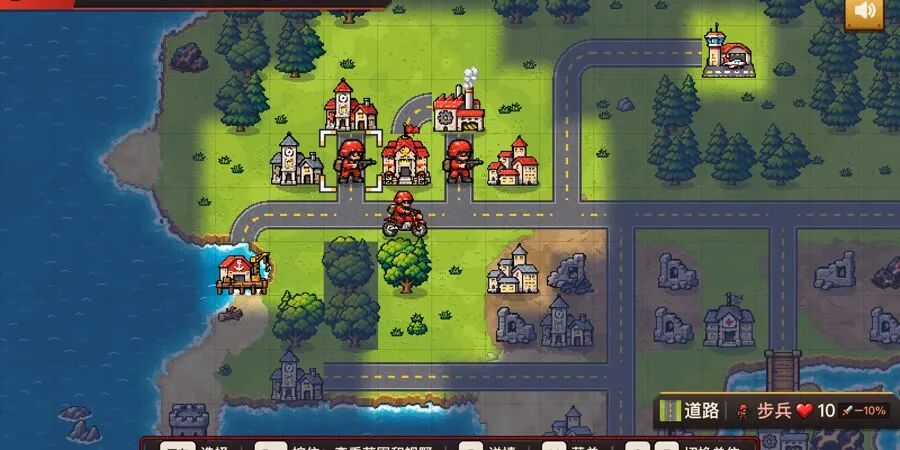
The whole window displays the battlefield, with a status bar at the top and bottom.
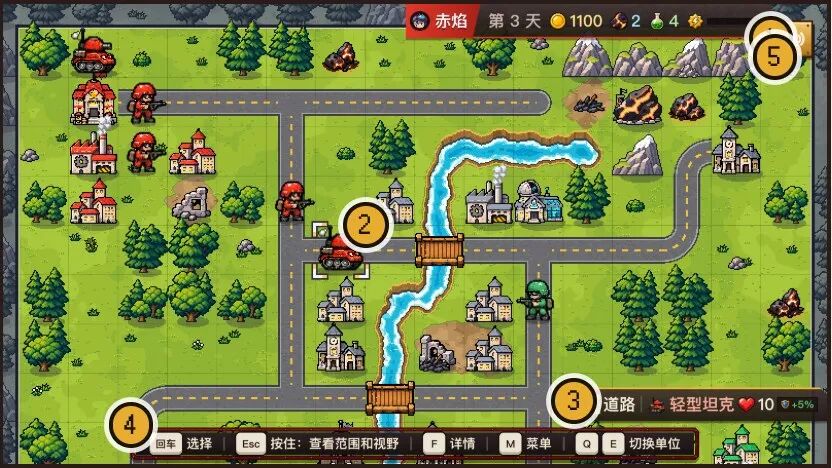 Match screen (Dawn Town, Red Flame's turn)
Faction bar: At the top. Displays the currently active faction, days, funds, meteorite fragments, research points, and skill slots. Click to open the turn menu.
Cursor: Move using the directional keys. Pressing confirm on your own units selects that unit. Pressing confirm in empty spaces opens the turn menu.
Information bar: At the bottom. Displays the terrain (stars indicate terrain defense) and unit (HP, current attack and defense bonuses) of the cursor position. Click to view details.
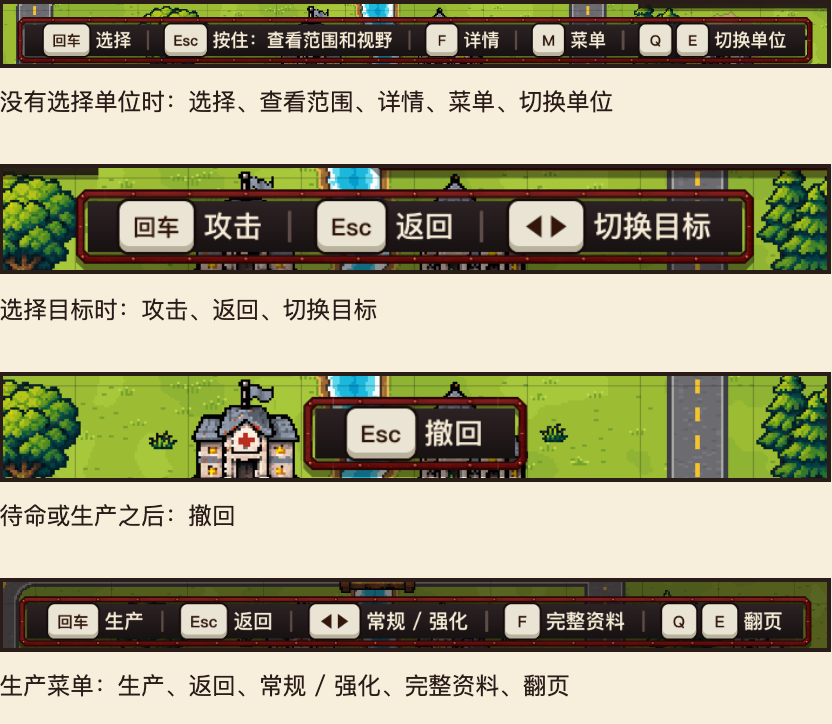
Hint bar: Displays currently available buttons and functions. After changing input devices, the key caps switch automatically.
Sound switch: On by default; click to turn off.
If the map is larger than the window, a mini-map will display; during the campaign, the goal bar will also be at the top of the screen, showing victory and failure conditions.
Faction bar from left to right: faction, days, funds, meteorite fragments, research points, skill slots.

Information bar: Terrain and terrain defense, unit, HP, and bonuses.

Full Mode: In "Settings," changing the interface from "Compact" to "Full" will turn the faction bar and information bar into panels with avatars.
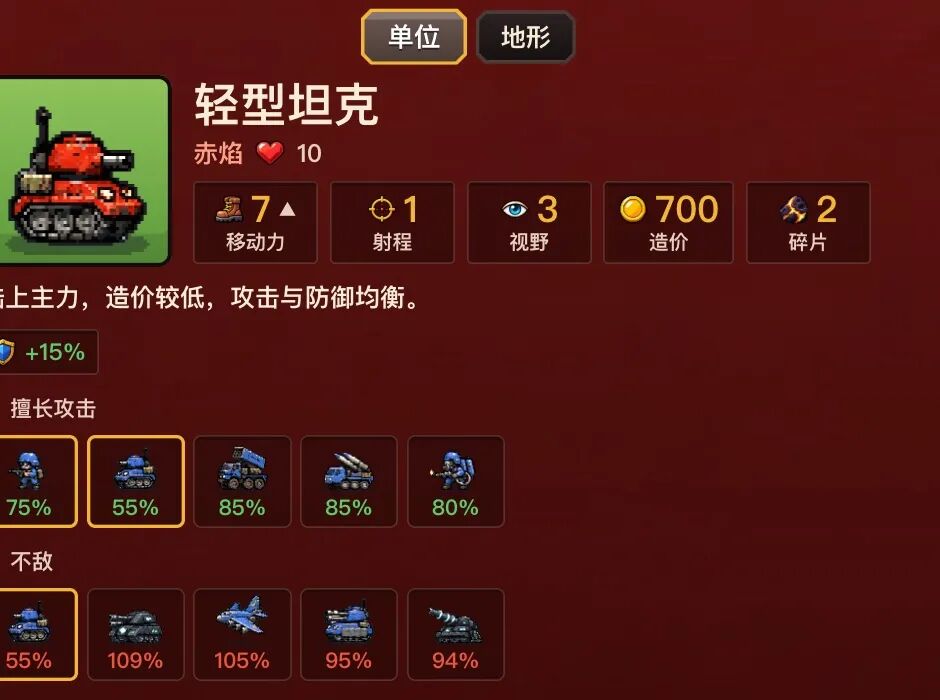
Detail card: When the cursor is over a unit or terrain, press the detail key to view complete information: statistics, descriptions, and units they excel against or are weak against.
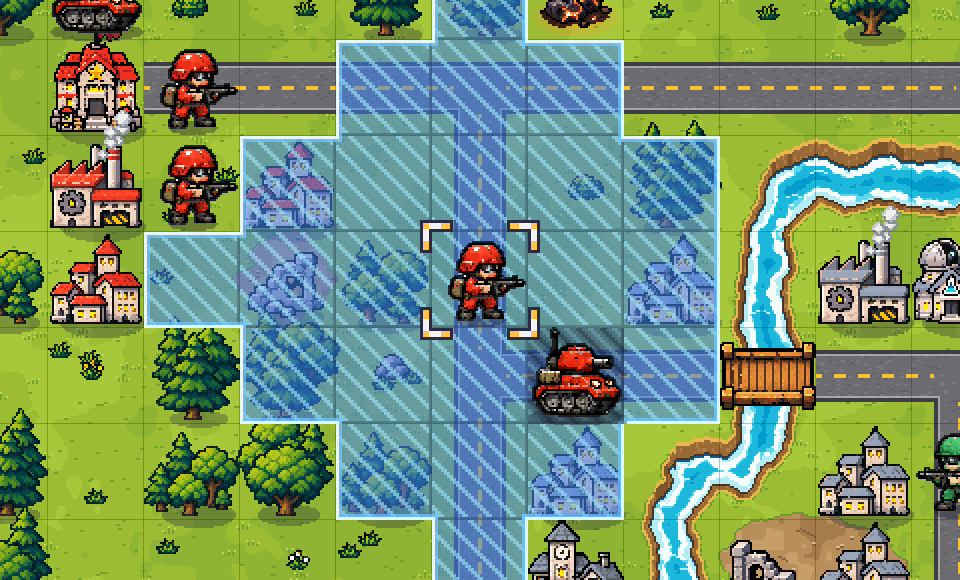
Hint: When the cursor is over any unit (including enemy units) and the cancel key is pressed, the movement range and attack range can be viewed. It’s advisable to check whether your units are within enemy attack ranges before taking action.
Turn Process
Each faction takes turns; during your turn, each unit can act once. A turn consists of six steps: Select unit → Move → Capture → Attack → Produce → End turn.
Step 1: Select Unit Move the cursor over your own unit and press "Confirm"; the highlighted squares represent this unit's movement range for this turn. Moving through forests and mountains incurs high movement costs, so the number of squares movable in different directions varies. Pressing Q, Tab, or gamepad LB, RB will allow you to switch between unacted units.
Step 2: Move Move the cursor to the target square and press "Confirm." The unit moves to that square, and an action menu displays. The action menu only lists currently available commands: attack, capture, board, merge, stand by, etc. Selecting "Stand By" will conclude the unit's action in that square. Pressing "Cancel" in the action menu returns you to reselect the target square. After selecting "Stand By," you can still press "Cancel" to withdraw before the next action.
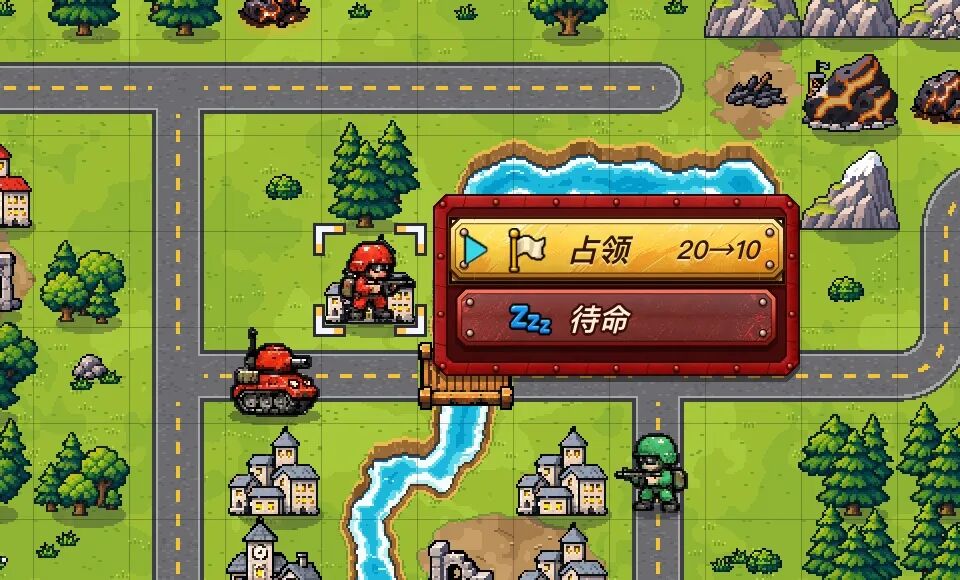
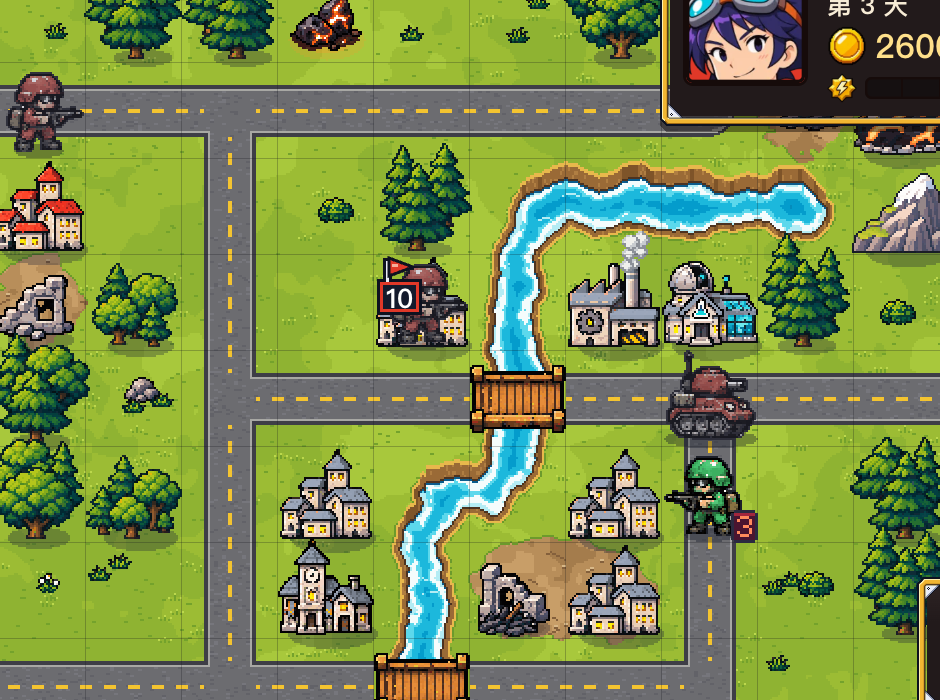
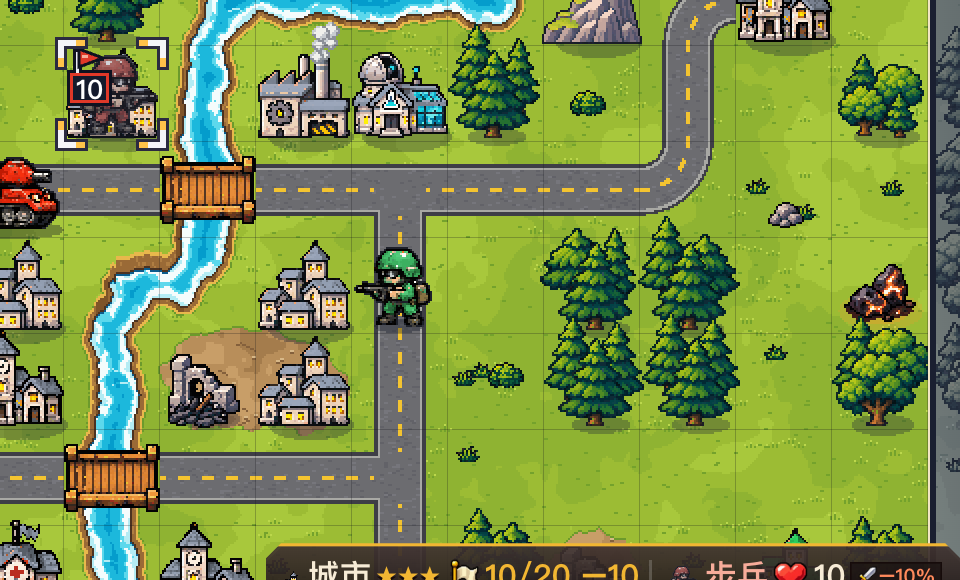
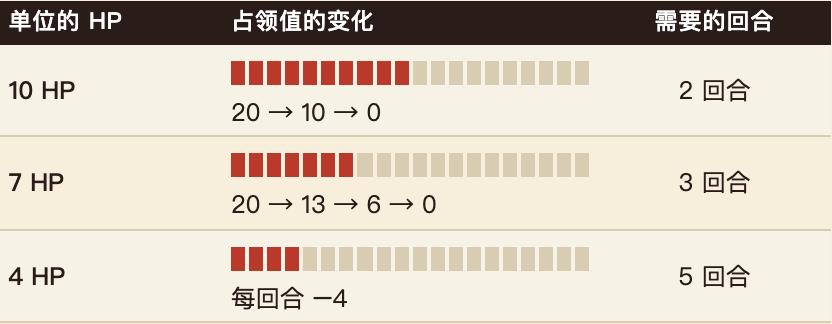
Step 3: Capture When infantry, anti-tank, or motorized units move to a neutral or enemy building, "Capture" appears in the action menu. Each building has a capturing value of 20; capturing reduces the unit's current HP each time. The small triangular flag and number in the upper left corner of the building indicate it is being captured; the number shows remaining capture value. Full HP units reduce by 10 each time (menu displays "20→10"), it requires 2 turns to complete capture. If units currently capturing leave or are destroyed, the capture value is reset to 20. Once a city is captured, it provides your side with 100 funding each turn.
Action Menu Commands (only currently available commands are listed)
Attack: There are visible enemy units within range
Capture: Capture-eligible units stand in neutral or enemy buildings
Stand by: Always available. The unit ends its action in the current square
Merge: Move to a square occupied by a fellow unit of the same type with less than full HP
Board: Move to a square occupied by your transport unit
Unload: The transport unit has units onboard and is adjacent to an empty accessible square
Launch: The capture-eligible unit is in an unused missile silo
Research: Press confirm when the cursor is over your command center or research institute (building menu)
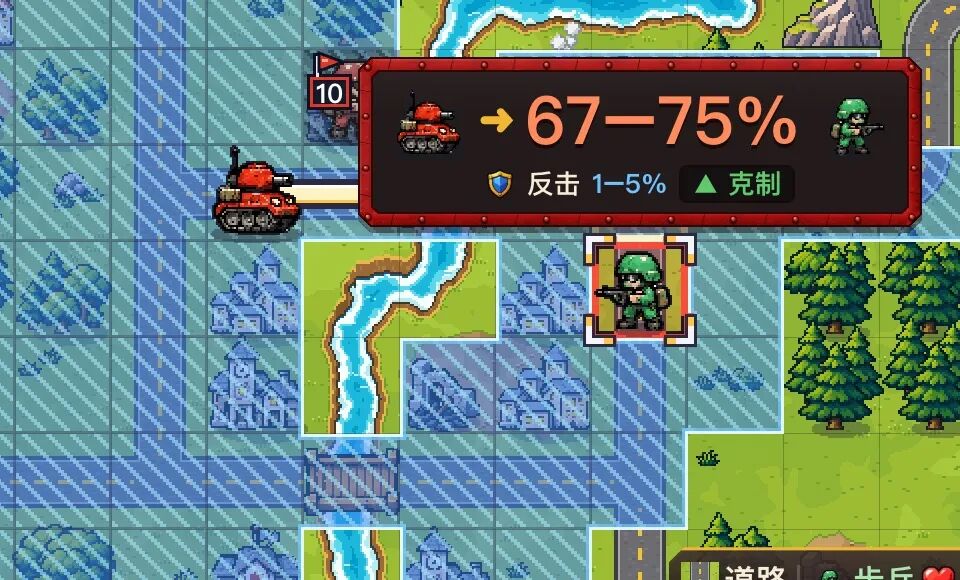
Step 4: AttackDirectly select the enemy unit. After selecting your unit, move the cursor over the enemy unit that can be attacked, and the screen displays damage estimates. Pressing "Confirm" makes the unit move to an appropriate position and attack. The large number is the range of damage for this attack; below that is the damage range for the enemy's counterattack. The legend shows light tank attacking infantry: damage 67–75%, counterattack 1–5%. 100% is equivalent to 10 HP. If "Countered" is displayed, it indicates your unit has an advantage; if "Disadvantage" is displayed, attacking is not advised. If you want to determine the attack position yourself, first move to the adjacent square of the target, then select "Attack" and the target in the action menu.
Step 5: Produce Move the cursor over your own factory (no units can be present on the building), press "Confirm" to open the production menu. Airports can produce air units, and ports can produce ships.
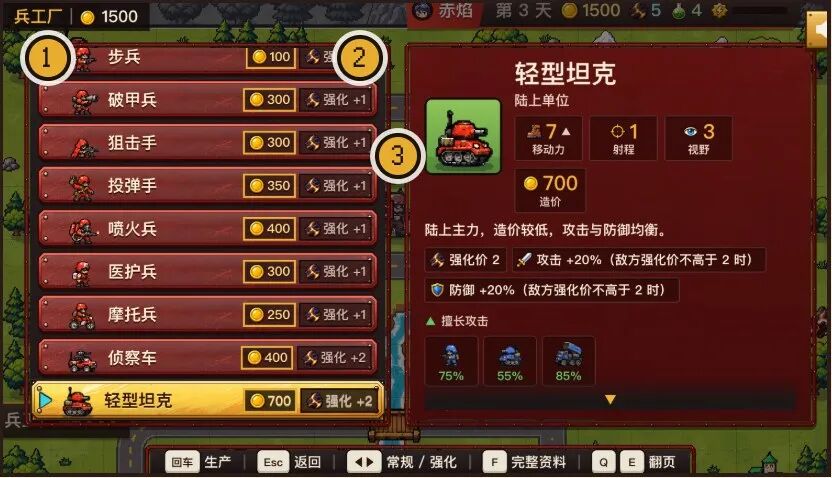
Unit types and production costs. If funds are insufficient, the unit is displayed in gray.
"Enhance +N": Extra payment of N meteorite fragments to enhance construction (effects in Chapter 3). Use left or right keys to switch between “Regular” and “Enhance.”
Unit cards: statistics, descriptions, units they excel against and those they are weak against.
Each production building can produce 1 unit per turn. Newly produced units cannot act in the same turn. After production, press "Cancel" before performing the next action to revert, returning the full amount of funds.
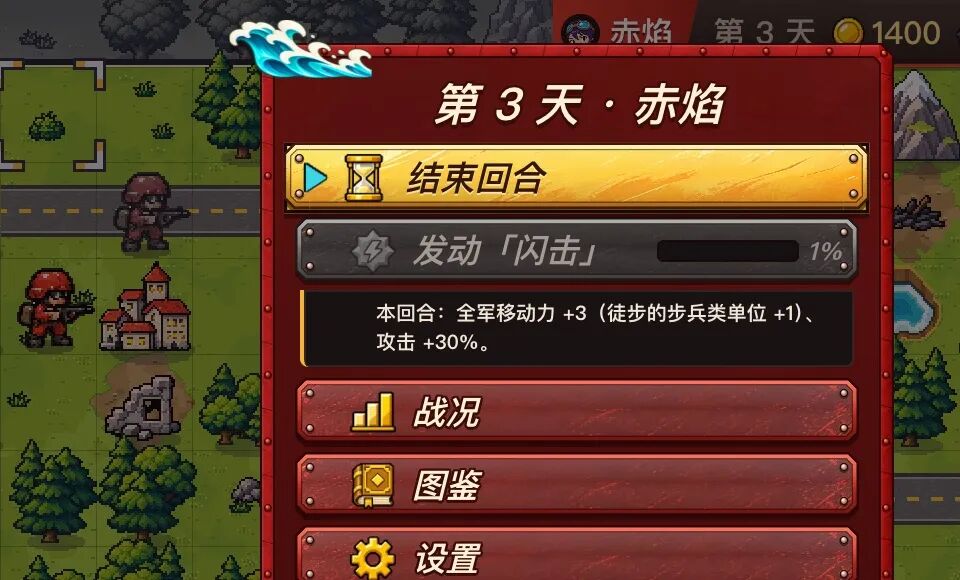
Step 6: End Turn Once all units have acted, press "Confirm" on empty land or press the menu key M to open the turn menu, selecting "End Turn." Other options in the turn menu: "Activate skill," "Status," "Pokedex," "Settings," "Surrender," "Return to Title." Afterward, other factions will act. At the beginning of the next player’s turn, they will first receive the round income, and then repair any units left at their buildings.
First Match Victory conditions: Capture the enemy command center, or destroy all enemy units. Basic approach: Use infantry to capture cities, use tanks for cover at the front, and continue production when sufficient funds are available.
Controls
Keyboard, gamepad, mouse, touchscreen can be switched at any time. There is no setup required for the four input devices. The hint bar displays the corresponding key caps according to the most recently used device.
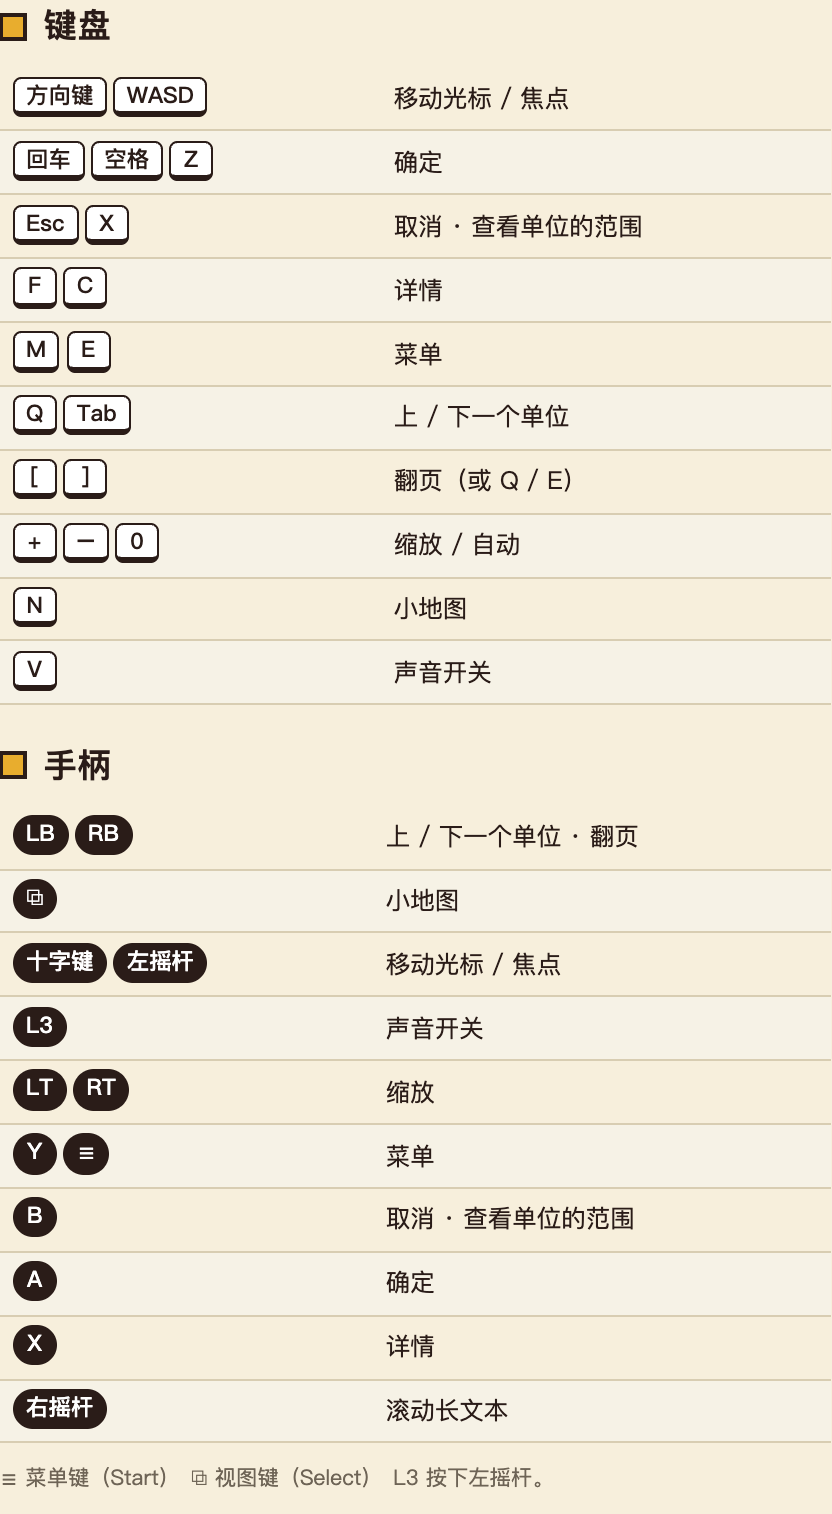
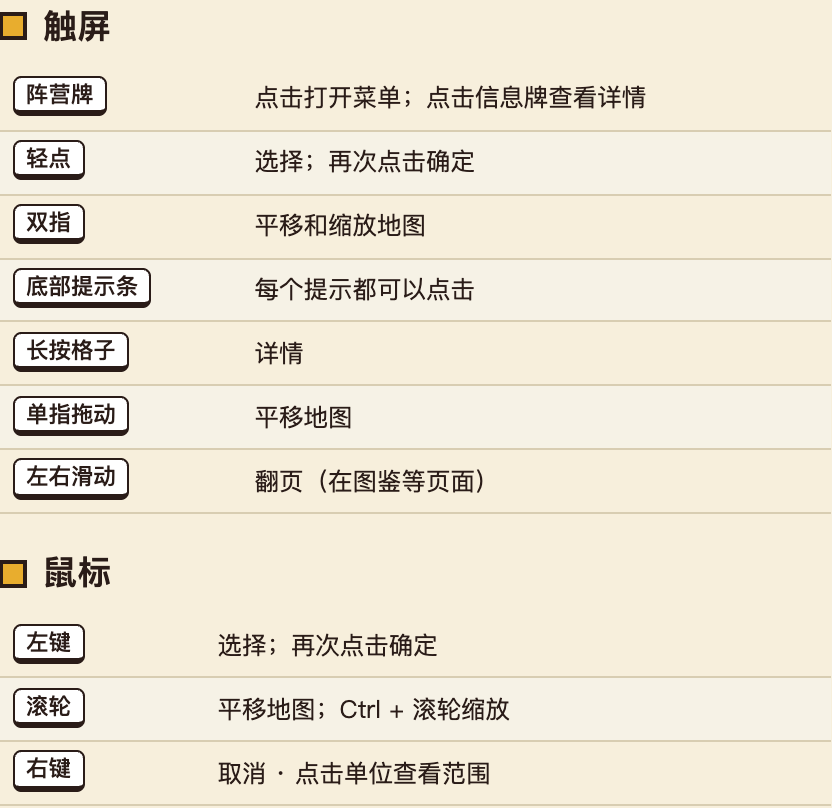
Hint bar is at the bottom of the screen, and its content changes according to the currently available actions.
Hint: The "Key Quick Reference Card" in the appendix can be printed separately. In the game, "Settings → Operation Instructions" provides diagrams for gamepad, keyboard, mouse, and touchscreen.
Pokedex and Language
There is a "Pokedex" in both the title page and turn menu. The unit types, terrain, and technology values in the manual can all be found in the Pokedex, which displays values from the current version.
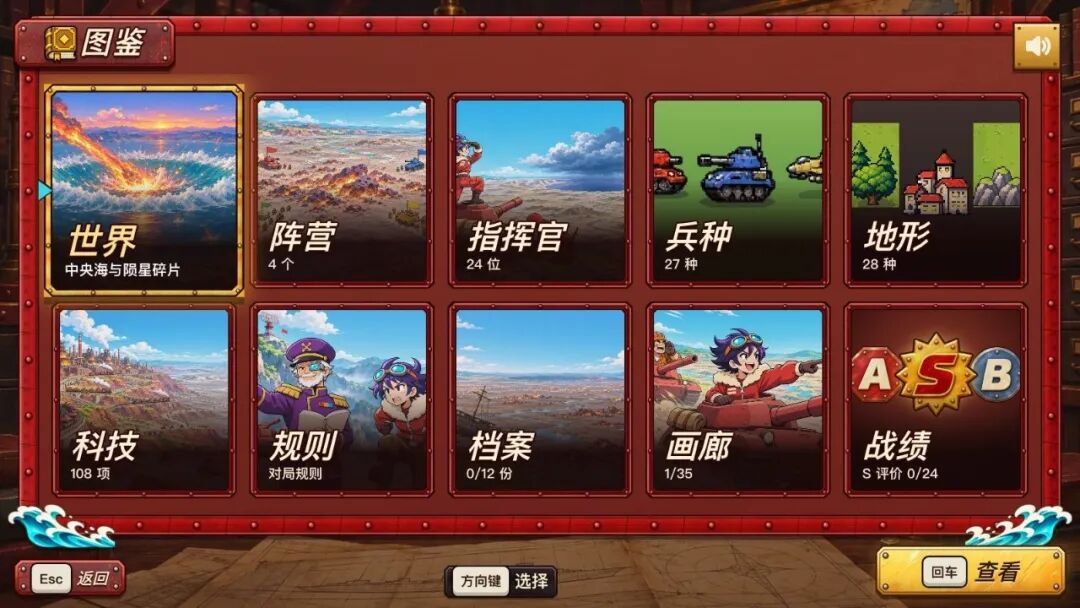
1 Pokedex Homepage includes world, factions, commanders, unit types, terrain, technology, rules, and files and gallery unlocked with the campaign.
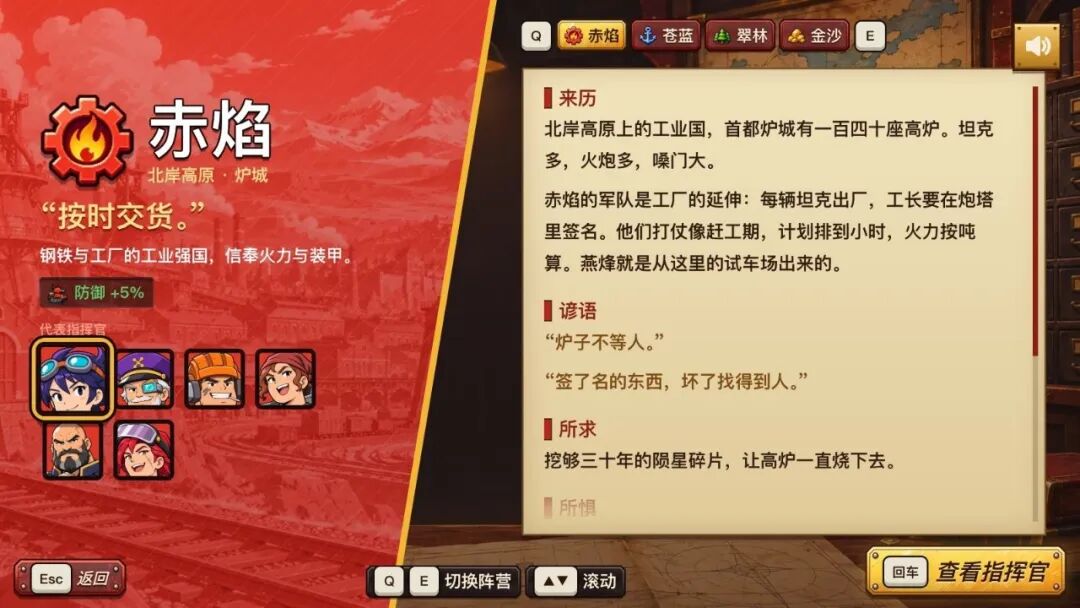
2 Faction displays the history, proverbs, faction characteristics, and representative commanders of each faction. Use the page-turn key to switch factions.
3 Unit Types show the appearance and statistics of unit types; press the main button to play the attack demonstration. Below lists the units they excel against and those they are weak against.
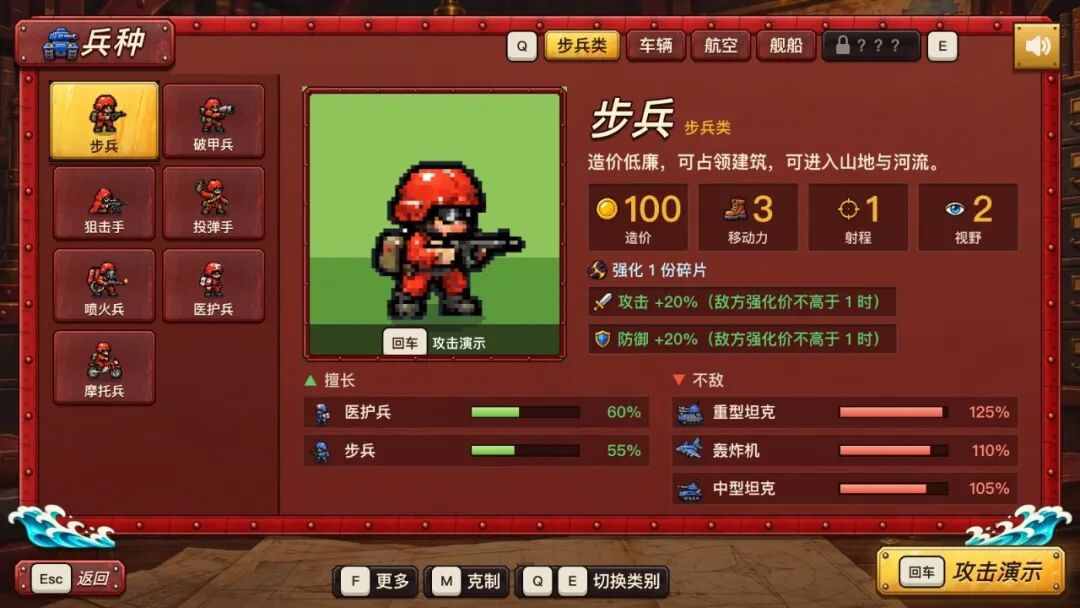
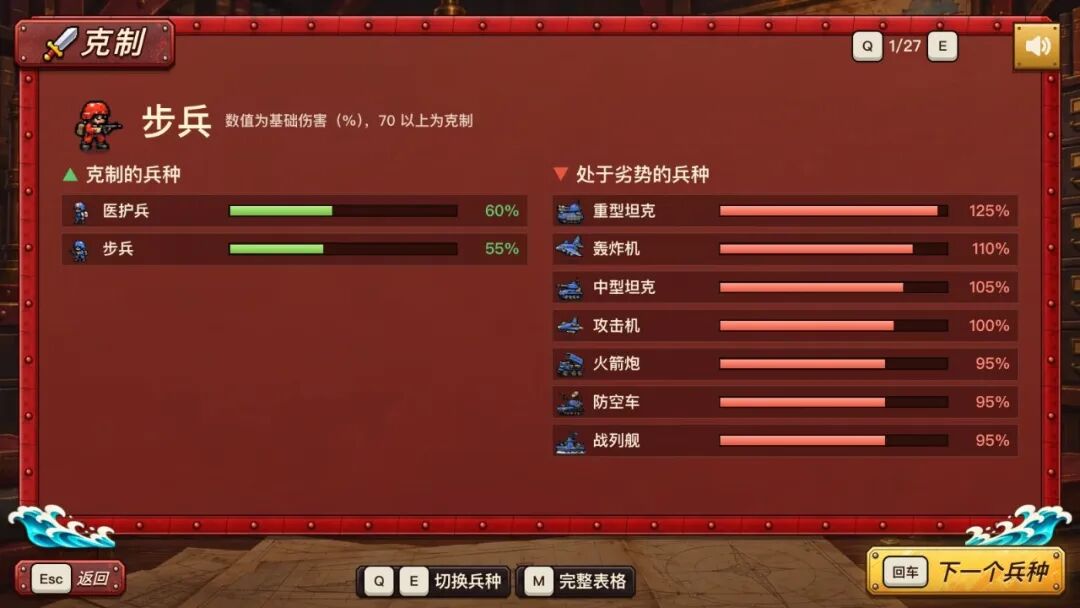
4 Counters can be opened on the unit page by pressing the menu key. A bar graph displays the base damage a unit inflicts against each type; pressing once more reveals the complete table.
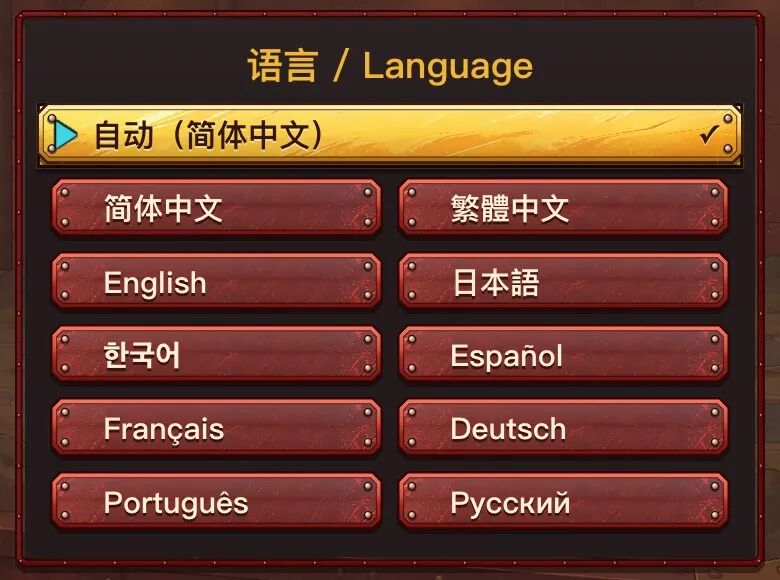
Changing Language The game provides 10 languages. Click the globe icon at the top right corner of the title page, or select "Language" in "Settings" to open the language list. The default is "Automatic": use the browser's language.
Other Settings
Interface: “Compact” and “Full” modes of the match screen (see "Screen Explanation").
Operation Instructions: Diagrams for gamepad, keyboard, mouse, and touchscreen.
Sound, animation speed, zoom, etc. Changes are saved immediately.
Chapter 3 Detailed Rules
Damage is determined by unit counters, the attacker's HP, and the terrain of the target; each building has a capture value of 20 points, and a full HP unit captures a building in 2 turns; research points are used to unlock technology, and meteorite fragments are used for enhancements.
Turns, Funds, and Victory Conditions
Turns and Days Each faction takes its turn in the order of Red Flame, Azure Blue, Emerald Forest, and Golden Sand. One faction acting once is one turn; each faction taking their turn is one day. During your turn, each unit can move once and then optionally attack, capture, or stand by. Acted units become dimmed and can act again next turn.
Settlement at the Start of Each Turn
Skill End: Effects from skills activated last turn end.
Income: Each income-building provides funds; meteorite mines also produce meteorite fragments.
Research Funding: Funding is paid according to the chosen tier at the start of each turn, yielding research points; research points from research institutes and the faction's research methods are also gained simultaneously.
Repairs and Healing: Units staying at friendly buildings recover HP (funds are required); friendly units adjacent to medics or repair vehicles restore HP (no funds required).
Funds Funds come from income buildings and are acquired at the start of each turn. The income of each building can be adjusted in the match settings.
Each turn income: Command centers, cities, factories, airports, ports each yield 100, and meteorite mines yield 200.
Radar Towers, Hospitals, Gates, Bunkers, and Research Institutes do not provide income.
Production
Factories: Land units (17 types)
Airports: Air units (5 types)
Ports: Ships (5 types)
Each production building can produce 1 unit per turn. Units cannot be produced when there are units on the building. Newly produced units cannot act during the same turn.
Scoring After a player defeats the AI, that match will be scored. Speed, Firepower, Technology each out of 100 points: Speed is calculated according to the number of days at victory, Firepower according to the number of enemy units destroyed, Technology according to the number of units lost. A total score of 270 points or above is rated S, 230 or above is A, 180 or above is B, and the rest rated C. The highest rating is recorded on the battlefield selection page, campaign level selection page, and the "Records" section in the Pokedex.
Victory Conditions
Capture Command Center: The faction that has its command center captured loses. All units of the defeated faction disappear, and the buildings belong to the capturing side.
Destroy All Units: The faction that has all its units destroyed loses. All buildings of the defeated faction turn neutral.
Day Limit: If there is a day limit, once it expires, compare the number of income buildings first, then compare the total cost of units.
In cases where only one team remains, that team is victorious. Campaign levels also have their own objectives (defending for a number of days, capturing specified buildings, escorting units, etc.), displayed on the pre-level page and at the top of the screen's goal bar.
Common Questions
No production menu appears after pressing confirm at the factory: There are units on the building; or this building has already produced this turn; or this building does not belong to your side.
Unit types in the production list appear gray: Insufficient funds. When selecting "Enhance," there may also be insufficient meteorite fragments.
Units become dim and cannot be selected: This unit has already acted this turn; or it is a newly produced or just unloaded unit this turn.
No "Attack" option in the action menu: There are no visible enemy units within range; ranged units cannot attack after moving; this type cannot attack the target type.
Cannot move to target square: Insufficient movement capacity (high movement cost through forests and mountains); this type cannot enter the terrain of the target square; there are other units on the target square.
Damage Calculation
Three main factors: unit counters, attacker's HP, terrain of the target.
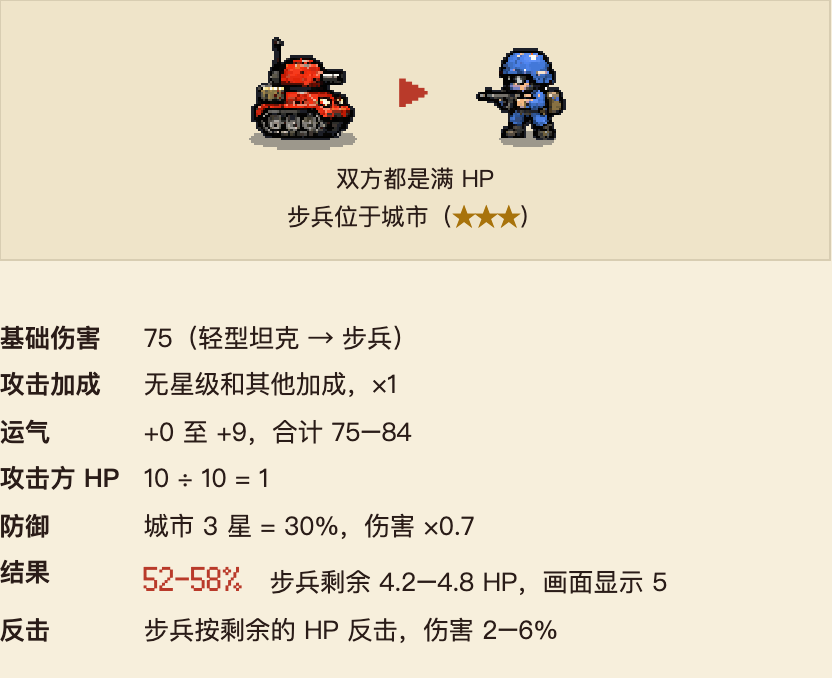
Damage = (Base Damage × Attack Bonus + Luck) × Attacker's HP ÷ 10 × (1 - Defense)
Base Damage: Determined by the types of units involved; see the counter table in Chapter 4. Light tank attacking infantry equals 75, infantry attacking light tank equals 5.
Attack Bonus: +5% for each star of the unit; +10% when within 5 ranges of own radar tower; +20% for enhanced units (the target's enhancement cost cannot exceed its own); plus adjustments based on commander specialties, skills, and technologies.
Luck: Each attack randomly increases by 0–9. Some commanders have different luck ranges.
Attacker's HP: The lower the attacker’s HP, the lower the damage dealt. A unit with 5 HP deals 50% of the damage.
Defense: Each star of the terrain of the target adds +10%, calculated based on the target's current HP ratio (50% when at 5 HP); each star of the unit adds +5%; enhanced units add +20% (the defense of the target's enhancement cost cannot exceed it); plus adjustments based on commander and technology. Maximum 70%. Air units are not affected by terrain defense.
Damage and damage estimates are displayed in percentages; 100% equals 10 HP. The HP displayed on the screen is rounded up: 4.2 HP remaining is displayed as 5.
Example: Light Tank attacking Infantry in a City
Damage for targets in different terrains (light tank attacking full HP infantry)
Road (no terrain defense): Damage 75–84%, infantry counterattack 0–3%
Plains (★): Damage 67–75%, infantry counterattack 1–5%
Forest (★★): Damage 60–67%, infantry counterattack 1–5%
City (★★★): Damage 52–58%, infantry counterattack 2–6%
Mountain (★★★★): Damage 45–50%, infantry counterattack 2–7%
For a light tank at 5 HP, the damage to infantry in a city is 26–29%. Two basic principles: Prioritize using full HP units to attack; aim to attack targets in low-defense terrain.
Exceptions When bombers attack, the terrain defense of the target is halved. Flamethrowers ignore the terrain defense of targets.
Counterattack, Ranged, and Stars
Counterattack: A unit that is attacked by an adjacent enemy unit but is not destroyed will counterattack. Counter damage is calculated based on the HP remaining after being attacked, favoring the attacking side.
Cannot counterattack when attacked by non-adjacent enemy units.
Snipers, self-propelled artillery, rocket artilleries, anti-air missiles, and battleships also cannot counterattack when attacked by adjacent enemy units.
Units that cannot attack the opposing type also cannot counter (e.g., infantry vs fighter jets).
Units stationed in own or neutral bunkers take half damage from counterattacks.
Stars Each enemy unit destroyed grants +1 star, with a maximum of 3 stars. Each 1 star increases attack +5%, defense +5%. Stars are displayed next to the units.
★ Attack +5% Defense +5%.
★★ Attack +10% Defense +10%.
★★★ Attack +15% Defense +15%.
Ranged Units: Units with a range limit greater than 1 are ranged units. Ranged units cannot attack after moving; they must attack from the original position; they cannot be countered when attacking non-adjacent targets.
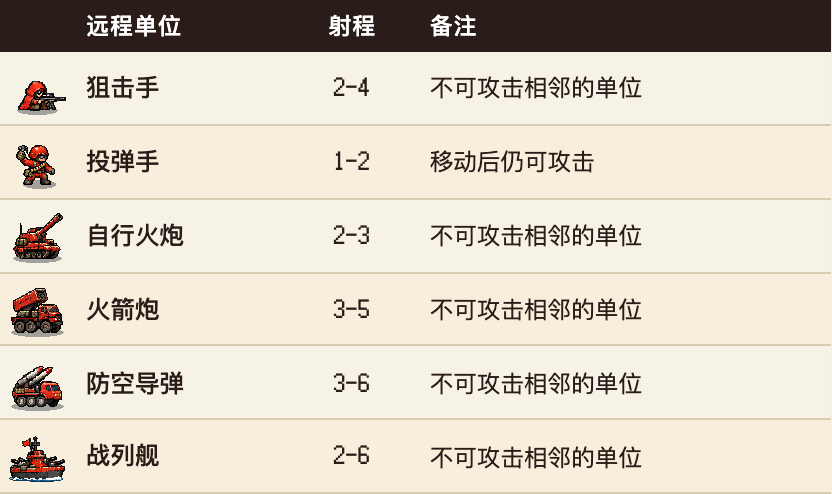
Ranged units on bunkers have +1 range; snipers and bombers on mountains have +1 range. These effects do not stack.
Cooperation of Direct Fire and Ranged Units
Ranged units attack first: Self-propelled artillery and rocket artillery cannot be countered when they attack. Use them first to lower the target’s HP.
Direct fire units attack later: The lower the target’s HP, the lower the counter damage. After reducing HP, you can then use tanks to attack, leading to lesser counter damage.
Protect Ranged Units: Ranged units cannot counter when attacked by adjacent enemy units. Position tanks or infantry in front to block enemy units from entering adjacent squares.
Counter Relationships Chart (Complete values can be found in the counter table in Chapter 4)
Infantry Units: Suitable to use recon vehicles, light tanks, anti-air vehicles, armed helicopters; not suitable for using anti-air missiles, fighter jets, submarines.
Tanks: Suitable to use medium tanks, heavy tanks, rocket artillery, bombers, anti-tank soldiers; not suitable to use infantry, recon vehicles, anti-air vehicles.
Artillery: Suitable to use recon vehicles, light tanks, armed helicopters, attack aircraft; not suitable to use infantry.
Air Units: Suitable to use anti-air vehicles, anti-air missiles, fighter jets, destroyers; not suitable to use light tanks, self-propelled artillery, battleships.
Ships: Suitable to use submarines, bombers, battleships, destroyers; not suitable to use infantry, fighter jets.
Submarines: Suitable to use destroyers; not suitable to use battleships, bombers, attack aircraft.
Terrain Overview
The star count indicates terrain defense; numbers indicate movement cost, ✕ indicates inaccessible.
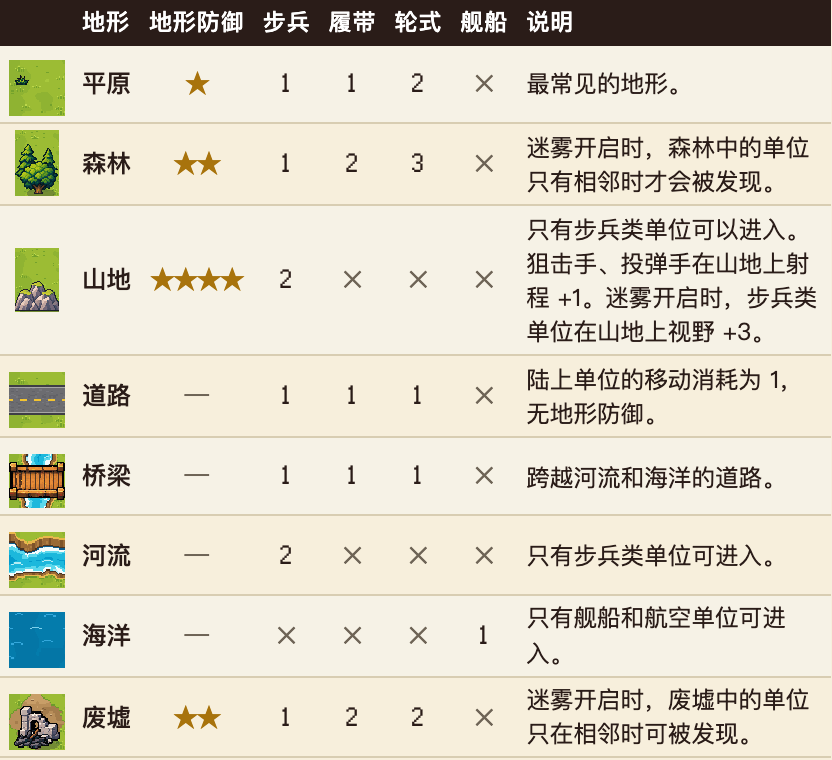
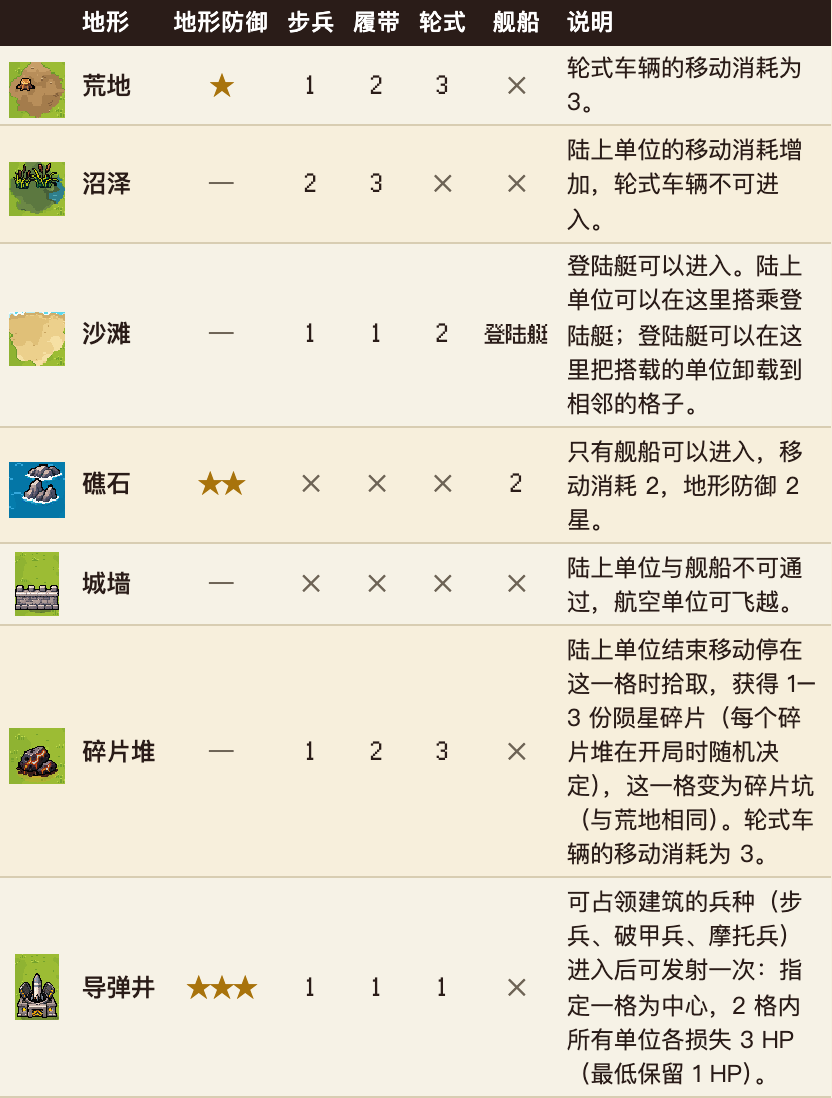
Movement Types
Infantry: Infantry, anti-tank soldiers, snipers, bombers, flamethrowers, medics
Tracked: Motorized soldiers, light tanks, medium tanks, heavy tanks, self-propelled artillery, anti-air vehicles, repair vehicles, transport vehicles
Wheeled: Recon vehicles, rocket artillery, anti-air missiles
Ships: Gunboats, destroyers, submarines, battleships, landing crafts
Air: Armed helicopters, transport helicopters, attack aircraft, bombers, fighter jets. The movement cost in all terrains is 1.
Key Points
Anti-tank soldiers and flamethrowers have a movement cost of 1 on mountains and rivers, lower than other infantry units.
Land units have a movement cost of 1 when entering any building.
Wheeled vehicles have high movement costs when moving off-road: Plains 2, Forests 3. Tracked vehicles: Plains 1, Forests 2.
Mountains can only be entered by infantry units (excluding motorized soldiers), terrain defense is 4 stars, suitable for defense.
Terrain defense only affects land units and ships; air units are unaffected by terrain defense.
Buildings and Capture
All buildings can be captured; income buildings like cities and factories provide 100 funds each turn, and meteorite mines provide 200.
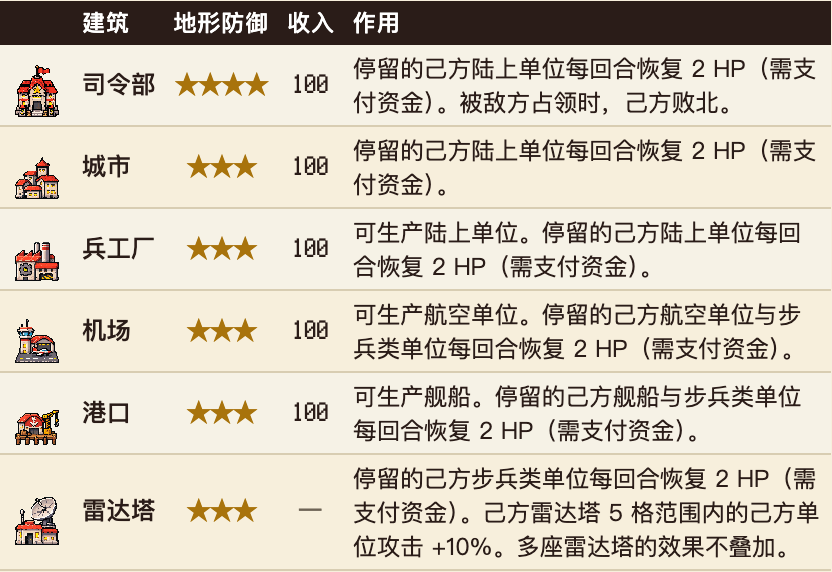
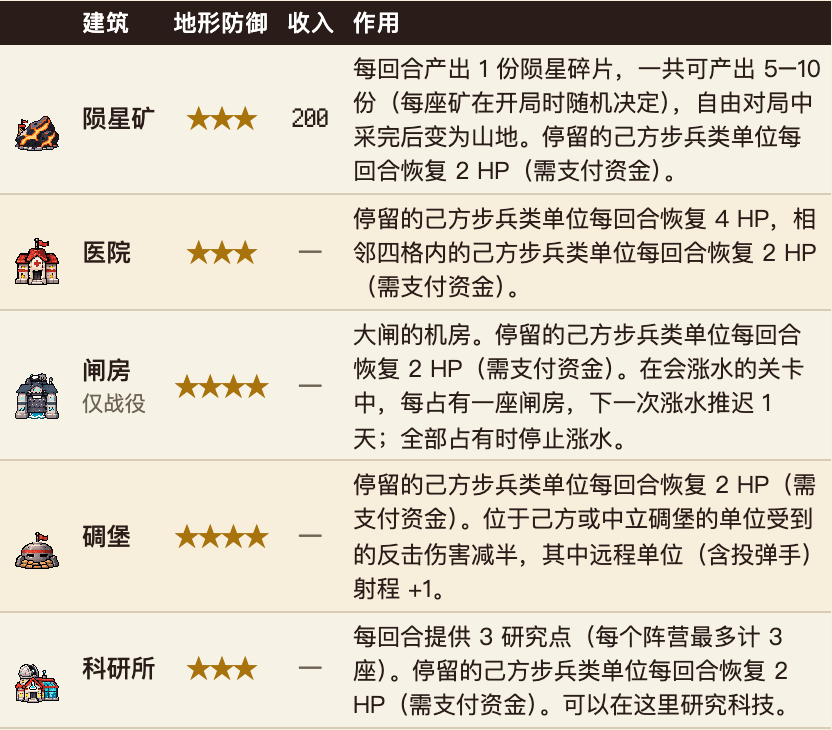
Capture Capture-eligible units: Infantry, Anti-tank soldiers, Motorized soldiers. After moving to a neutral or enemy building, select "Capture" from the action menu. Each building has 20 capture points, and each capture reduces the unit's current HP:
Key Points
If a unit that is capturing leaves or is destroyed, the capture value resets to 20. If an enemy unit captures your building, destroying that unit can interrupt the capture.
The faction whose command center is captured loses immediately. It is advisable to keep one unit stationed at your command center.
Friendly (same team) buildings cannot be captured.
At the beginning of the match, prioritize capturing buildings: Each city provides 100 funds each turn, and each meteorite mine provides 200 funds.
Missile Silo Eligible units (infantry, anti-tank soldiers, motorized soldiers) can launch a missile once after entering: Designate a square as the center, and all units within 2 squares lose 3 HP (minimum 1 HP retained). Each can only be used once, affecting both enemy and friendly units. Confirm that there are no friendly units within the range before launching.
Repairing, Healing, and Radar Towers
Units with incomplete HP deal low damage and capture slowly. There are three methods to recover HP: repairing at friendly buildings (funds are required); being adjacent to medics or repair vehicles (no funds required); merging with a friendly unit of the same type.
Repairing at Buildings At the start of the turn, units staying at friendly buildings recover 2 HP, each recovered HP costs 10% of the construction cost in funds. If insufficient funds exist, only 1 HP can be restored; if still insufficient, no recovery occurs.
Infantry units: Any friendly building, 2 HP restored each turn.
Vehicles: Command centers, cities, factories, 2 HP restored each turn.
Air units: Airports, 2 HP restored each turn.
Ships: Ports, 2 HP restored each turn.
Restoring HP at the Front Line
Medics: Each adjacent friendly infantry unit restores 2 HP each turn (no funds required). The effects of multiple medics do not stack. Medics cannot heal themselves.
Repair Vehicles: Each adjacent friendly vehicle, air unit, or ship restores 1 HP each turn (no funds required).
Hospitals: Friendly infantry units stationed restore 4 HP each turn; friendly infantry units within four squares recover 2 HP each turn (funds required).
If a unit meets multiple recovery conditions, only the maximum one is taken—it does not stack.
Repair Costs Example (Cost → Repair Cost to recover 2 HP)
Infantry: 100 → 20
Light Tank: 700 → 140
Medium Tank: 1200 → 240
Self-propelled Artillery: 600 → 120
Armed Helicopter: 900 → 180
Bomber: 2200 → 440
Battleship: 2200 → 440
Repair costs to recover 2 HP amount to 20% of the construction cost, which is lower than the creation cost. For units of high cost but low HP, it is advisable to withdraw them to friendly buildings for repairs.
Radar Towers The defense of units within 5 squares of your radar tower increases by +10%. The range is calculated based on the number of squares above, below, left, and right (see the diagram below). This bonus is effective during both active attacks and counterattacks.
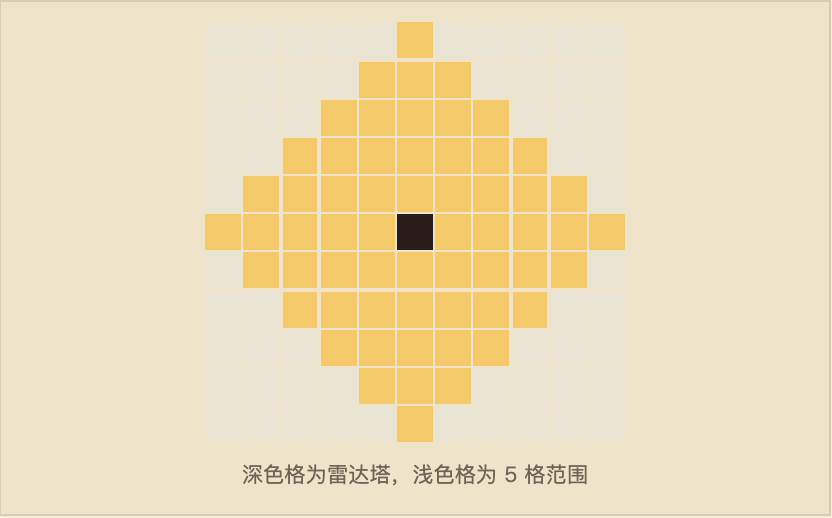
The effects of multiple radar towers do not stack.
Only applies to factions occupying the radar tower, excluding allies.
When fog is active, your radar towers can see 5 squares around them.
Radar towers do not provide income. When hovering over the radar tower, the map displays its range.
Hint: Radar towers are typically situated between factions. Occupying a radar tower and fighting within its range increases the damage dealt by your units each time.
Merging, Transporting, and Withdrawing
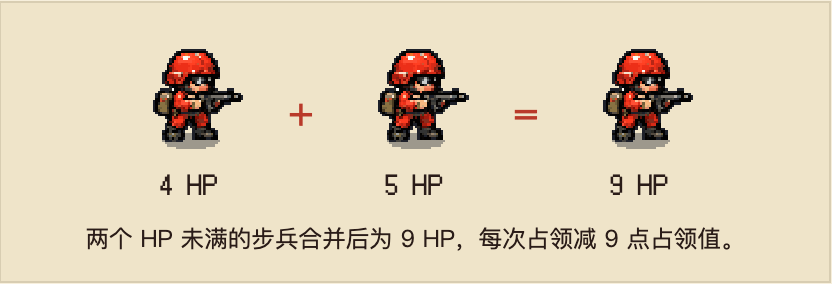
Merging Move one unit to the square occupied by another unit of the same type with incomplete HP and select "Merge" from the action menu. The two units merge into one:
HP adds together, up to a maximum of 10. Any excess over 10 returns funds based on the construction cost.
Stars take the higher of the two units.
The merged unit's action for this turn is concluded.
If one of the units is an enhanced unit, the merged unit will also be treated as such. If both are enhanced units, return the enhancement cost of one of the units.
Withdrawing and Cancelling The following two operations can be withdrawn, but only before the next action is taken:
Production: Newly produced units disappear, and all funds and meteorite fragments are fully refunded, allowing the building to produce again this turn.
Movement: Only for moves that have stood by after moving, without producing other results (attacking, capturing, picking up, etc.). The unit returns to its original position and can act again.
When a withdrawal is possible, the hint bar will display "Withdraw"; press "Cancel" to withdraw. Movement that ambushes cannot be withdrawn. When targeting a square or the action menu is displayed, pressing "Cancel" goes back to the previous step and does not count as withdrawal. If this move allows you to see new squares or enemy units while fog is active, it also cannot be withdrawn.
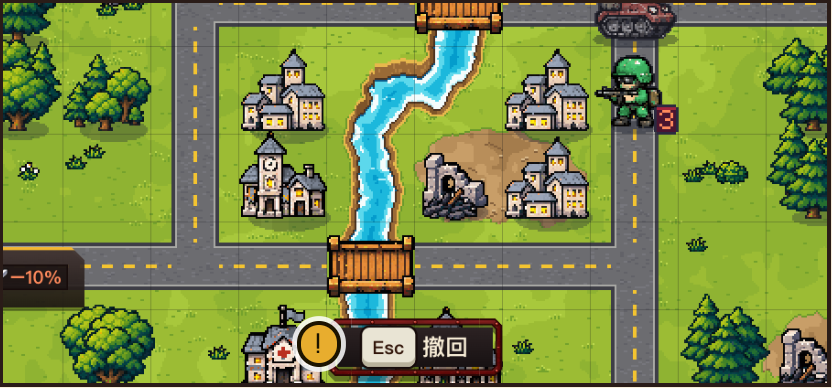 Infantry on standby shows 'Withdraw' on the hint bar
Transport
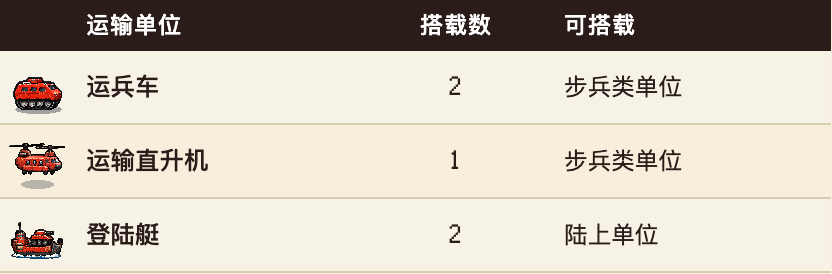
Board: Move the unit to the square occupied by your transport unit.
Unload: After the transport unit moves, select "Unload" from the action menu to place the carried unit onto an adjacent accessible square. The unloaded unit cannot act again this turn.
When the transport unit is destroyed, any units onboard are also destroyed.
Friendly transport units cannot be boarded.
Motorized soldiers cannot board transport vehicles or helicopters; they can only board landing crafts.
Landing crafts can enter sandy beaches. Land units can board on beaches or ports; once the landing craft reaches the opposite beach, they will unload the units into adjacent squares.
Steps for Transport
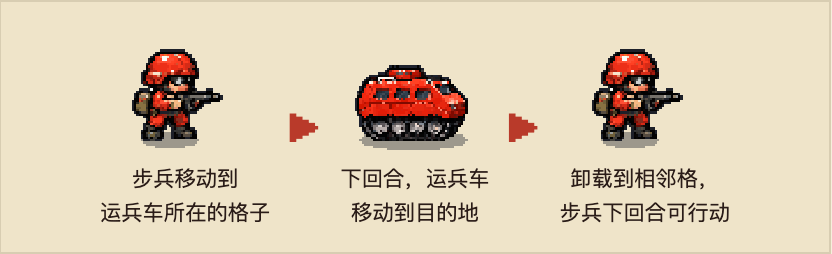
Hint: Use transport helicopters to deliver infantry next to enemies' buildings and capture them in the next turn. The enemy will need to return units for defense.
Selling Typically, units cannot be sold. Some commander skills or technologies permit selling units for a portion of the construction cost, refer to Chapter 5.
Fog of War and Vision
Only effective when “fog of war” is enabled in the match settings.
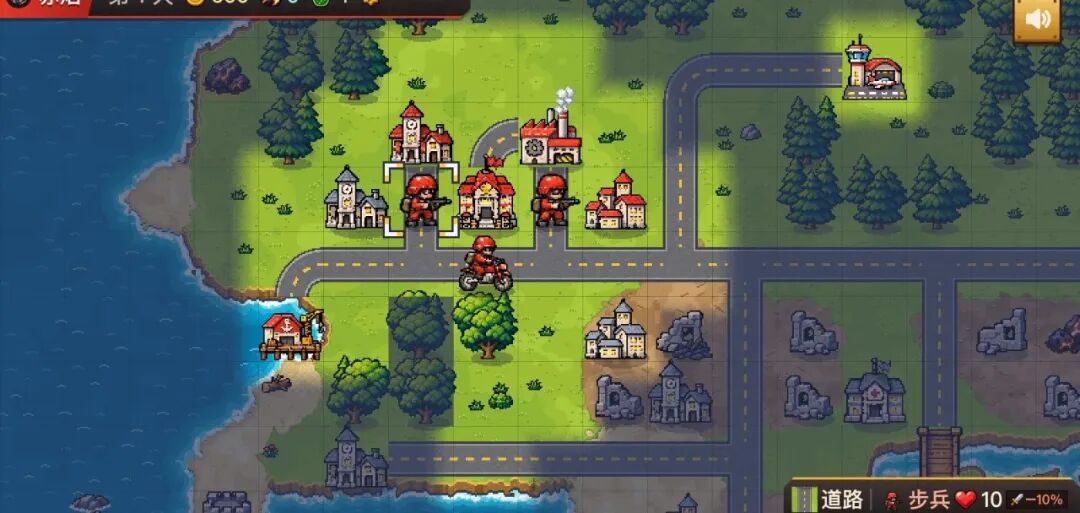 When fog is active: Bright areas represent friendly vision; enemy units and capture progress outside this vision are not displayed.
Vision Range
Each unit can see squares within the vision range (calculated based on the number of squares to the top, bottom, left, and right). Various unit types have vision ranging from 1–5, refer to the unit cards.
Infantry units gain +3 vision on mountains.
Friendly buildings can see the square they occupy; command centers can see the surrounding 2 squares; radar towers can see the surrounding 5 squares.
Allied factions share vision.
Concealment
Units located in forests, ruins, or rocks (excluding air units) are in a concealed state and can only be discovered when adjacent to friendly units.
Submarines can only be detected when adjacent, while destroyers can spot them within 2 squares.
Flamethrowers can spot concealed units in forests, ruins, or rocks within 8 squares around them.
Rules When Fog is Active
Can only attack visible targets.
- Ambushing: If a unit moves and encounters an undiscovered enemy unit, its movement is halted, ending its action for this turn. It's advisable to scout ahead with recon vehicles before entering unexplored forests.
Enemy production, movement, and capture happenings outside of vision are not displayed. The ownership of buildings is always visible.
Computer AI is similarly affected by fog.
Vision of Each Unit
5: Recon vehicles, fighters, submarines.
4: Attack and bomber aircraft.
3: Snipers, motorized soldiers, light and medium tanks, anti-air vehicles, armed helicopters, transport helicopters, gunboats, and destroyers.
2: Infantry, anti-tank soldiers, bombers, flamethrowers, medics, heavy tanks, self-propelled artillery, anti-air missiles, battleships.
1: Rocket artillery, repair vehicles, transport vehicles, landing crafts.
Hint: Rocket artillery, transport vehicles, landing crafts, and repair vehicles have a vision range of 1. Ranged units need vision from recon vehicles or infantry in front to attack distant targets.
Commander's Characteristics and Skills
Each faction selects a commander at the start of the game.
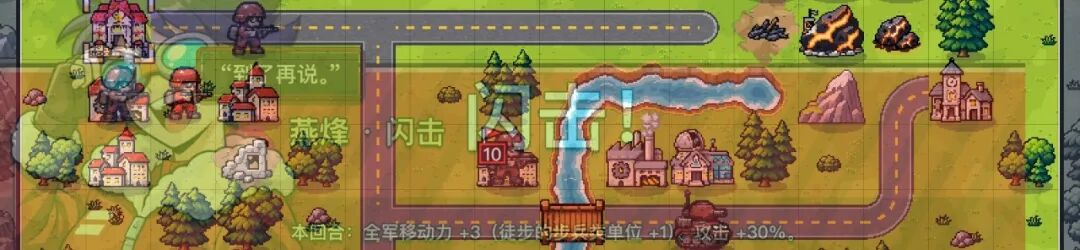 Yan Feng activates the skill 'Blitz'
Three Abilities
Specialty: The specialty is effective from the start. It typically strengthens one type of unit while weakening another, thus determining what types of units this commander is suitable for producing.
Skill: Once the skill bar is full, it can be activated from the turn menu during your turn. The skill effects can be viewed in the turn menu. Most skills last until the start of the opponent's next turn.
Faction Characteristics: Permanent effects associated with the faction of the commander (see Chapter 1 "Overview of the Four Countries"), unrelated to the colors of the armies.
Accumulation of Skill Bar The skill bar is displayed in the faction bar, with a maximum value of 400 points. Both attacking and taking damage can accrue the skill bar, with accumulation calculated according to the cost lost:
Taking damage: For each HP lost equivalent to 10 funds, the skill bar +1.
Attacking: For each HP lost equivalent to 10 funds from enemy units, the skill bar +0.5.
In battles involving three or more teams, the reverse applies: attacking +1 points, taking damage +0.5 points.
Example: A light tank worth 700 loses 5 HP, equating to a loss of 350 funds. Our skill bar +35, enemy skill bar +17.5.
免责声明:本文章仅代表作者个人观点,不代表本平台的立场和观点。本文章仅供信息分享,不构成对任何人的任何投资建议。用户与作者之间的任何争议,与本平台无关。如网页中刊载的文章或图片涉及侵权,请提供相关的权利证明和身份证明发送邮件到[email protected],本平台相关工作人员将会进行核查。


