Author: Changan I Biteye Content Team
Can someone who has never edited a video create an AI short video with a plot, dialogue, and scene transitions?
Yes, and the entire process takes less than half a day.
This article will teach you to go from: thinking of a story → breaking it into scenes → generating a video → editing it into a film.
No prior knowledge is needed; follow along, and you will have a complete AI short video.
1. From Idea to Story: AI Videos are Not Created from a Simple Prompt
Many people’s first step in making an AI video is to open Jidream, staring blankly at the input box, unsure of what to write. They type a few words, and the result is far from what they imagined, leading to doubts about whether the tool is not user-friendly or if they just can’t write prompts.
For example, saying "I want to create a scenario of Biteye's little sister being reborn in the crypto world as a big shot" is an idea, not a story.
An idea is a direction; it tells you roughly what to create. A story is a structure; it tells you what should be filmed in each shot. To go from an idea to a story, there is some work to do in between, which is script planning.
The simplest way is to open any LLM and directly tell it the vague idea in your mind, letting it help you flesh out the story. You don’t need to clarify all the details yourself; you just need to provide a direction, and the rest can be deduced together with it.
Once the storyline is established, don't split the scenes right away. Cut it into several large segments according to the narrative rhythm, clearly defining the core event of each segment. This step controls the overall pace, preventing any segment from dragging on or being too rushed.
Jidream allows a video of up to 15 seconds; in practice, segments under 12 seconds are the most stable, with the lowest likelihood of visual issues. For a 1-minute final video, assuming an average of 10 seconds per segment, you will need about 5 segments.
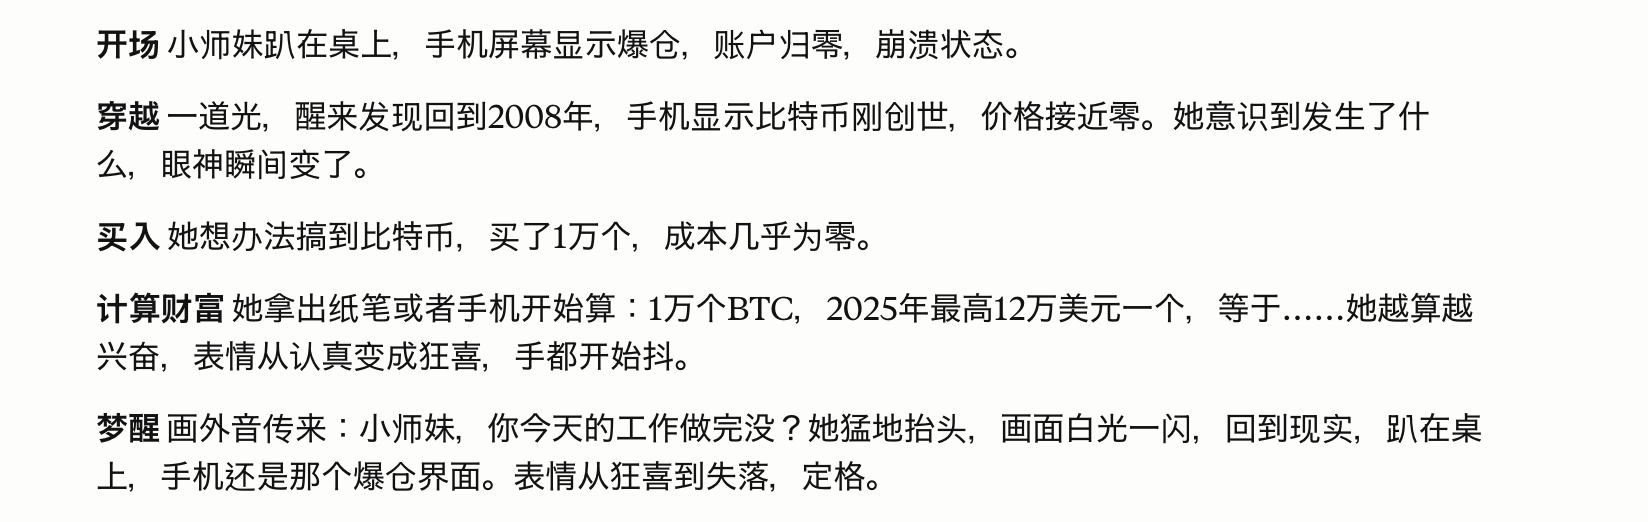
We have broken our story into five segments:
Segment One: Introduction, the core task is to establish the scene and characters.
Segment Two: Time travel, the core task is to convey the timeline.
Segment Three: Show the character's transition from confusion to clarity.
Segment Four: Calculate wealth, pushing the emotions to a climax.
Segment Five: Complete the reversal, forming a loop with the introduction.
Once the segments are defined, further break each segment down into specific shot descriptions. For each shot, write four elements: main subject, location, action being performed, and filming angle. Do not write motion in the storyboard; only describe still moments.
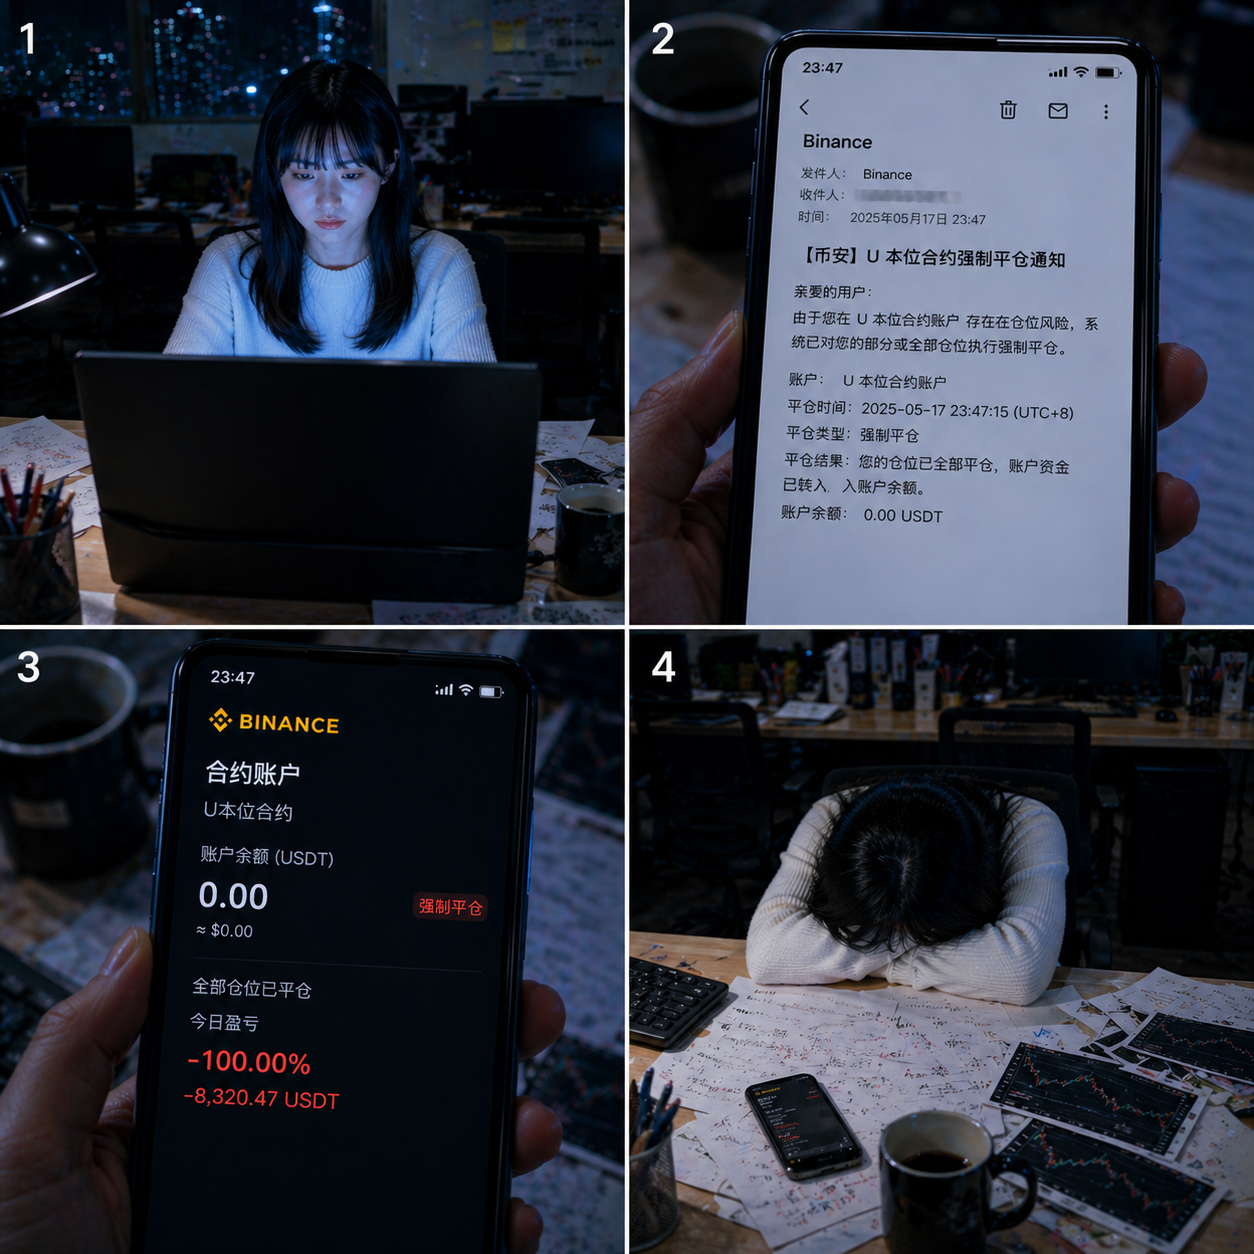
Copy the script of Segment One into the AI chat box and input "Help me generate shot descriptions based on the script of Scene One." The resulting effect is as follows👇
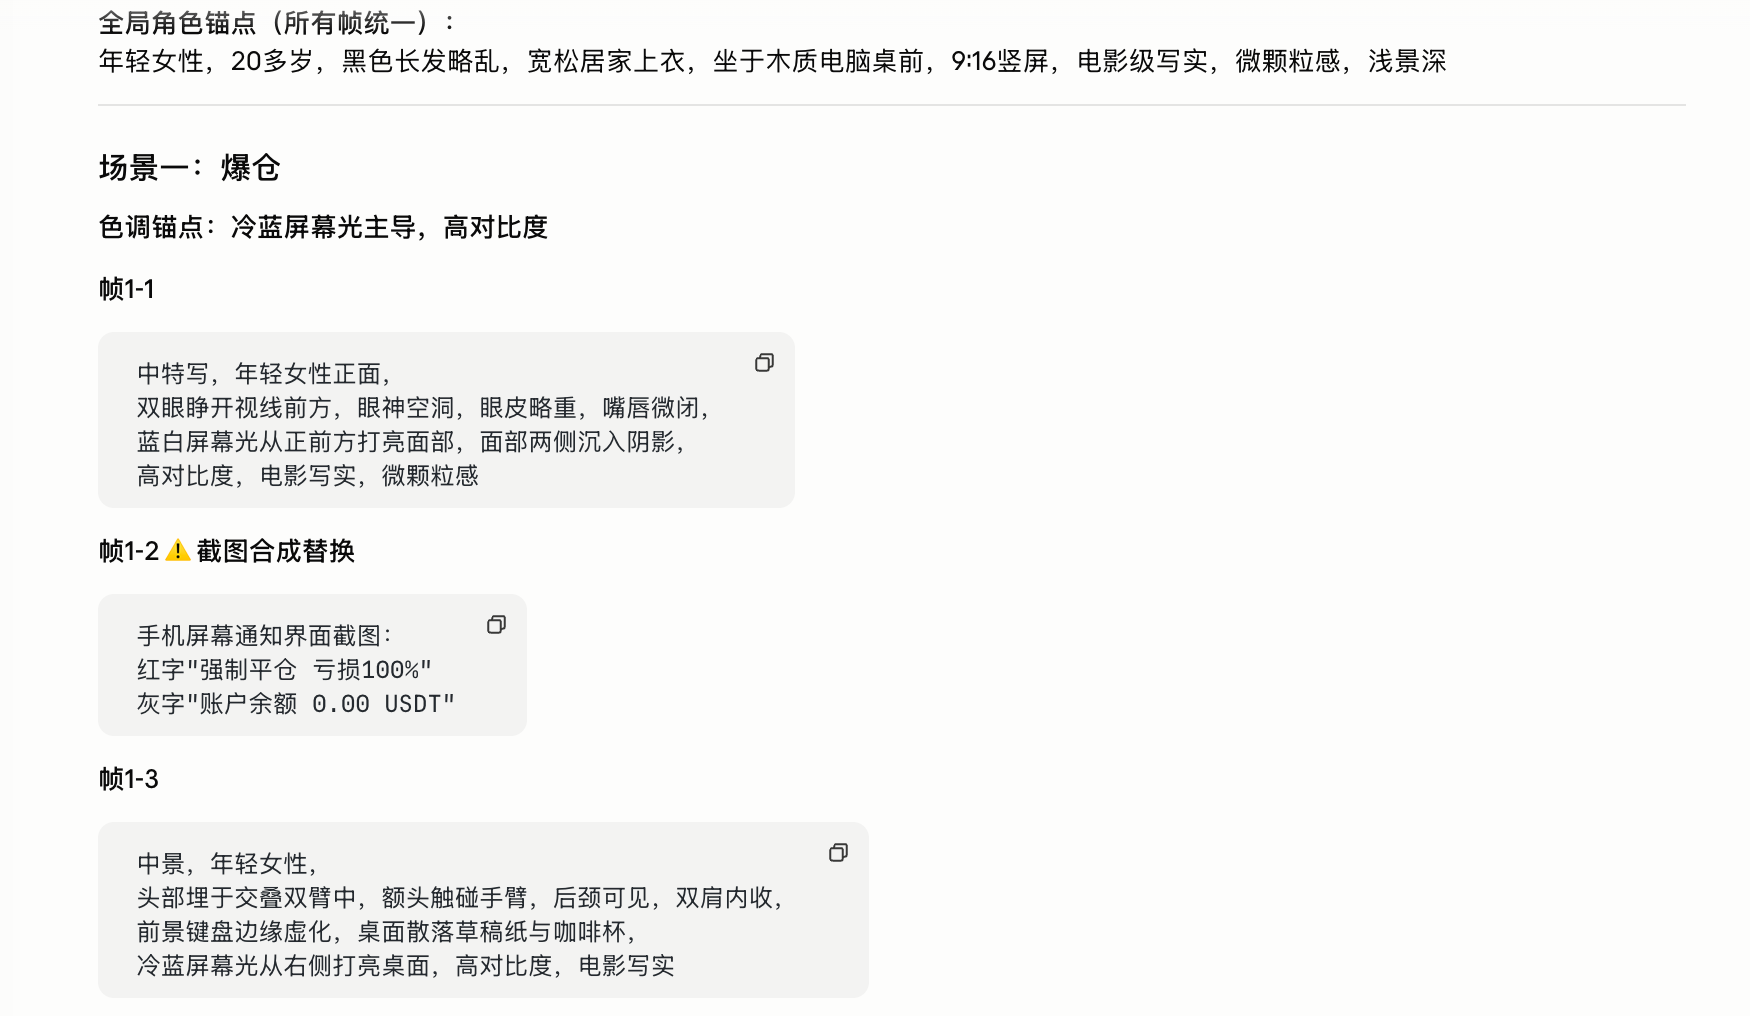
2. From Story to Image: First Lock Down Characters, Scenes, and Shots
This chapter is the core of the entire process; the quality of the images you generate here directly determines the upper limit of the final video quality.
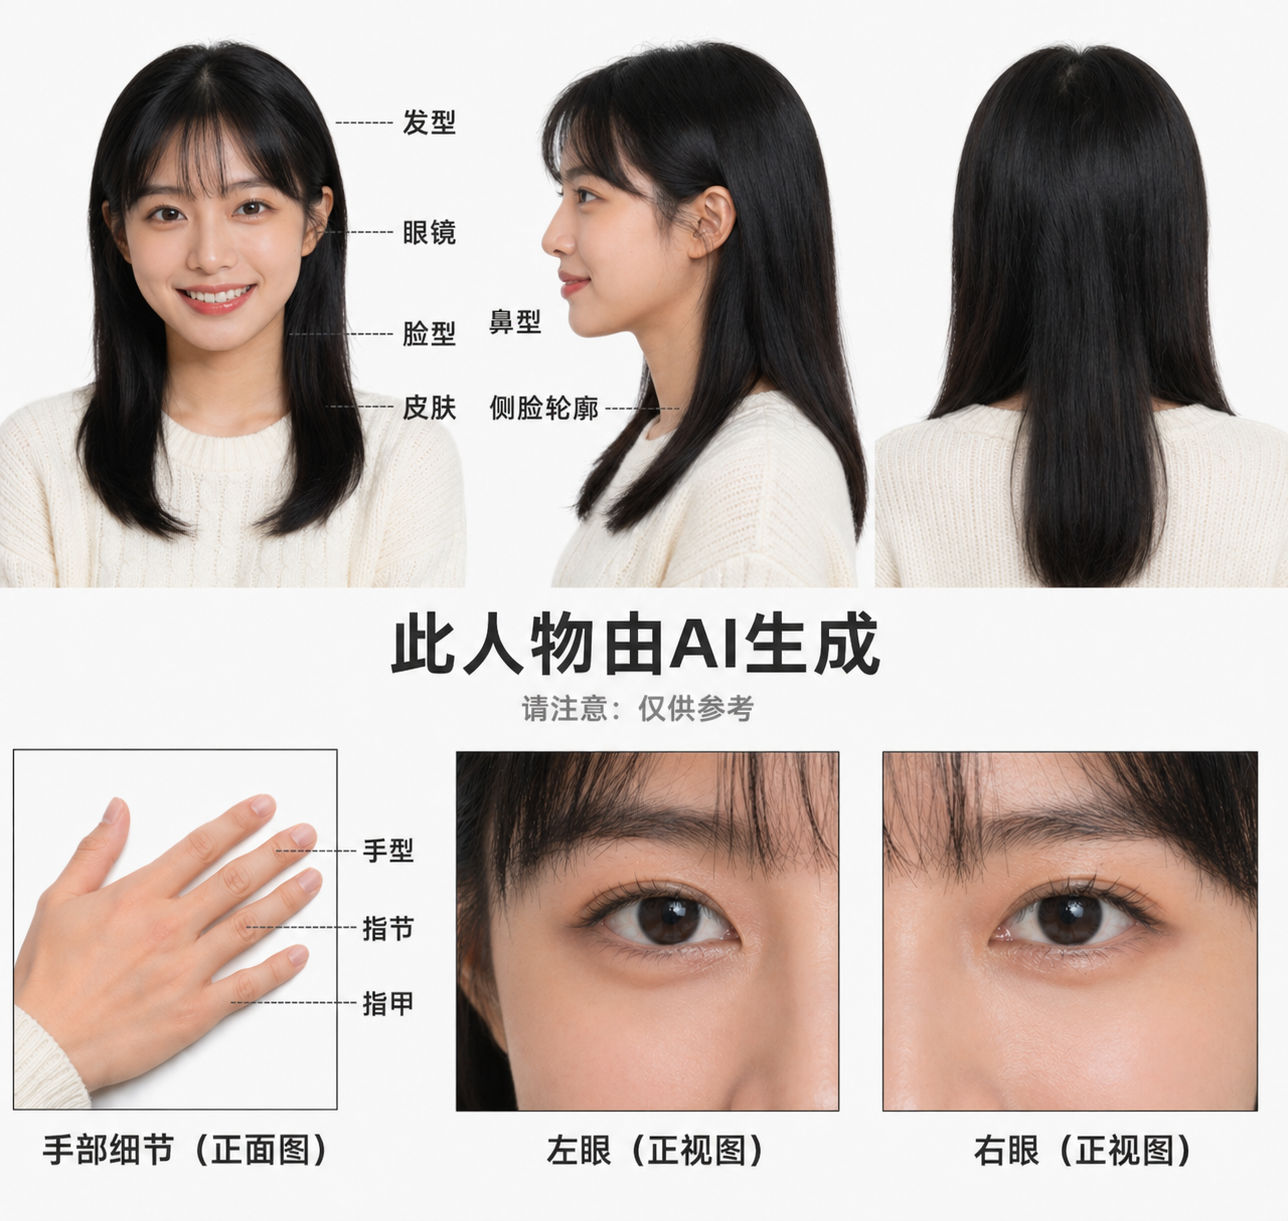
First, create three views to lock down your protagonist.
Before generating any storyboard images, the first thing to do is to create the three views of your main character.
The three views refer to three images of the same character from the front, side, and back, aimed at fixing this person’s appearance. For the subsequent scenes generated, these three images will be referenced to maintain character consistency.
If you skip this step and directly generate storyboard images, you will find that every character generated looks different, with variations in hairstyle and face shape, and the video cannot be produced.
Open ChatGPT/Seedream and input in the dialogue box:
"Help me generate a three-view image of Biteye's little sister."
The AI will generate a picture featuring the same character from three angles. If the generated character differs significantly from your expectations, you can upload a reference image.
Once satisfied with the three views, download the image, and upload it as a reference for every subsequent video generation.
Then create a scene reference image to lock down your background.
After confirming the character, use the same logic to separately generate a reference image for your scene by inputting, "Help me generate an image of an office."

Before officially beginning to generate storyboard images, you need to understand a basic concept: a shot is the smallest expressive unit in a video.
Shots can also convey messages; different shot compositions communicate different information. Common compositions include:
Wide shot: establishes information, allowing the audience to know where the scene is and which characters are present.
Medium shot: advances the plot, clearly displaying actions and expressions, the most commonly used shot in narratives.
Close-up: evokes emotions, focusing only on the face, hands, or a key prop to amplify details and offer a strong emotional impact to the audience.
After understanding individual shots, it’s also important to recognize that a video is not made up of a single shot, but of multiple shots combined rhythmically.
In actual production, we usually organize a video’s shot structure using "four-square" and "nine-square" formats—essentially arranging 4 or 9 shots in a video for a complete expression.
The choice between four-square and nine-square fundamentally controls the rhythm:
For slower-paced segments: such as the introduction establishing the environment or the emotional closure at the end, four-square is sufficient, allowing each shot enough space to breathe.
For faster-paced segments: such as climactic fight scenes, the camera needs to switch rapidly to create tension; here, nine-square is better, with nine shots packed into a segment resulting in a completely different feel in the edit.
Having understood shots and rhythm, we can now begin the actual production: turning the abstract story into specific visuals.
Once the character three views and scene reference images are prepared, the next step is to transform the previously written storyboard descriptions into visual frames. This is because AI is better at handling "fixed single frames" rather than "continuously changing processes", which can significantly reduce generation failures.
The specific approach is:
Each time a shot is generated, first upload the character three views and corresponding scene reference images into the ChatGPT dialogue, then input the previously written storyboard generation prompt.
"Help me generate a four-square storyboard image based on the story outline + scene descriptions (including the previous storyboard words generated with AI), along with the scene image + character image."
The model will decompose that shot into four images based on the provided storyboard information, ensuring consistency of character and scene, with the effect as follows:
💡 Little Tips: When generating images from text, there are some frequent pitfalls; knowing them in advance can save many attempts:
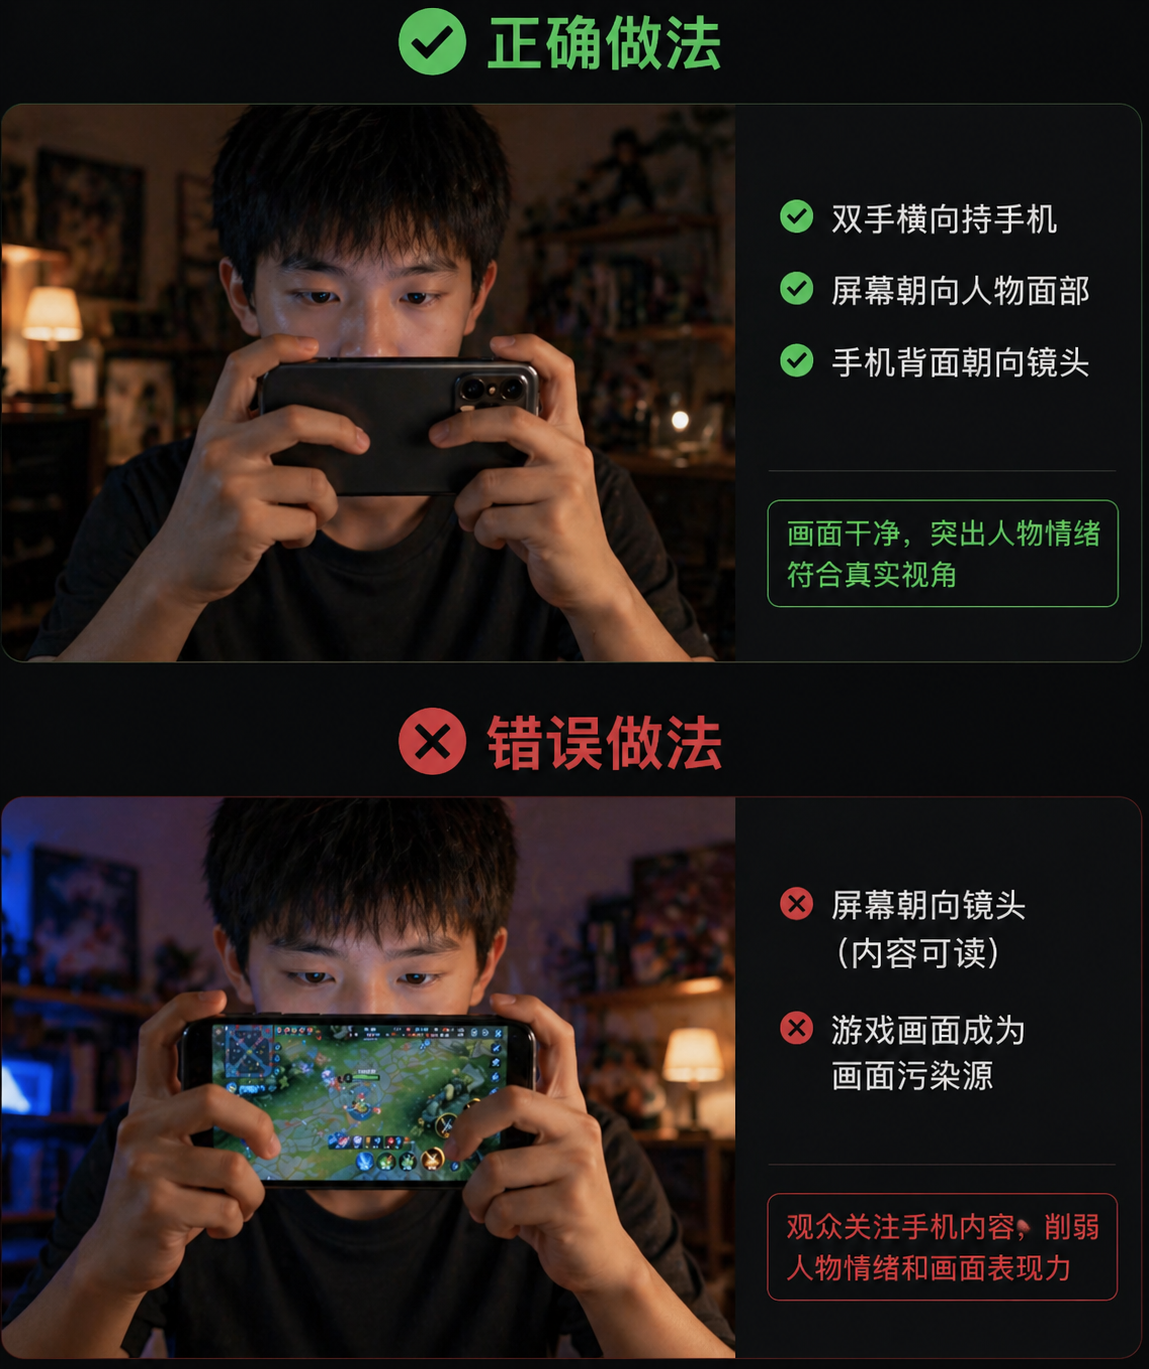
If you want to generate an image of a character playing a game on a phone, the generated phone screen will automatically face the audience. The AI’s logic is to make the "content readable"; playing a game becomes a source of interference in the image. The correct approach is: "Holding the phone horizontally with both hands, screen facing the character's face, back of the phone facing the camera."
Using job titles can cause the AI to envision a whole scene: writing "nurse" makes the AI think of a hospital, while "chef" brings to mind a kitchen. The correct approach is: only describe the attire you truly want, without mentioning job titles.
Text-to-image can only generate still images; "turning the head" has no corresponding visual state. The correct approach is: only describe what exists at that frame.
3. From Image to Video: Write Actions in Prompts, Don’t Rewrite Images
Now that the storyboard images are ready, we need to turn them into moving videos.
🌟 Register on Jidream
Open your browser and search for "Jidream AI", then go to the official website. Click on the login at the top right; you can register using a Douyin account or phone number, directly accessible in China.
New users can generate a 15-second video for free. If you need to start a membership, Biteye's little sister has also compared the prices of the multi-platform Seedance 2.0 available across the internet. For details, please see: "The Guide to the Lowest Cost Subscription for Seedance 2.0 Is Here!".
🌟 How to Write Video Prompts?
This is the most crucial part of this step and also where beginners are most likely to make mistakes.
First, upload all your reference images at once. Jidream supports uploading multiple reference images, just drag the pictures into the chat box. Upload all the materials you prepared in the previous chapter: character three views, scene reference images, four-square or nine-square storyboard images, all at once. Jidream will use the information from these images to generate the video.
Many beginners make the mistake of re-describing what is in the image. Jidream can already see the uploaded images; you don’t need to tell it what’s in the images again.
The prompts should describe: what is moving in the image, how it is moving, whether the camera itself is moving, and what happens during each time segment.
Write according to the following template, with each line corresponding to a time segment in the video:
"Help me generate a video based on the above storyboard.
[Start second to End second], [Shot composition], [Camera movement], [Character or subject] + [Specific action], sound effect: [Sound description]."
🌟 Sound descriptions are the portions beginners tend to overlook the most. If there are dialogues in the video, writing "speaking sound" is not enough; the model will randomly generate a sound as a reference. To ensure that the character voices are consistent across multiple segments, there are two methods:
1️⃣ Use the audio from the first segment as a reference.
Generate the first segment video, and if you are satisfied with the result, export the audio separately from this video. For every subsequent segment you generate, upload this audio as a voice reference; Jidream will refer to this voice tone to generate the voices in future segments, ensuring consistency.
2️⃣ Use Fish Audio to find reference voice tones.
Open Fish Audio, search for voices that match the character’s temperament, listen to and download one segment as reference audio. Use this reference audio uniformly for every segment generated, keeping the sound consistent throughout the video.
🌟 Use punctuation to control the AI voice-over tone.
Writing dialogues for the AI voice model is not just about entering text. The same sentence, with different punctuation, can deliver a completely different tone.
The core logic is: punctuation controls pauses, and pauses determine emotions.
… Ellipses create breaks in speech but maintain breath, suitable for expressing thoughtfulness, hesitation, or unfinished sentences.
…! Combined usage indicates a sudden burst after suppression.
() The content inside parentheses automatically lowers in volume, becoming whisper-like, suitable for inner monologues or soliloquies.
*Content* Words wrapped in asterisks become lower, slower, and heavier for emphasis on key information.
[] Instructions within brackets are not dialogues, for instance, [deep breath], [pause for 1 second]. The model will execute actions rather than read them aloud.
💡 Little Tips:
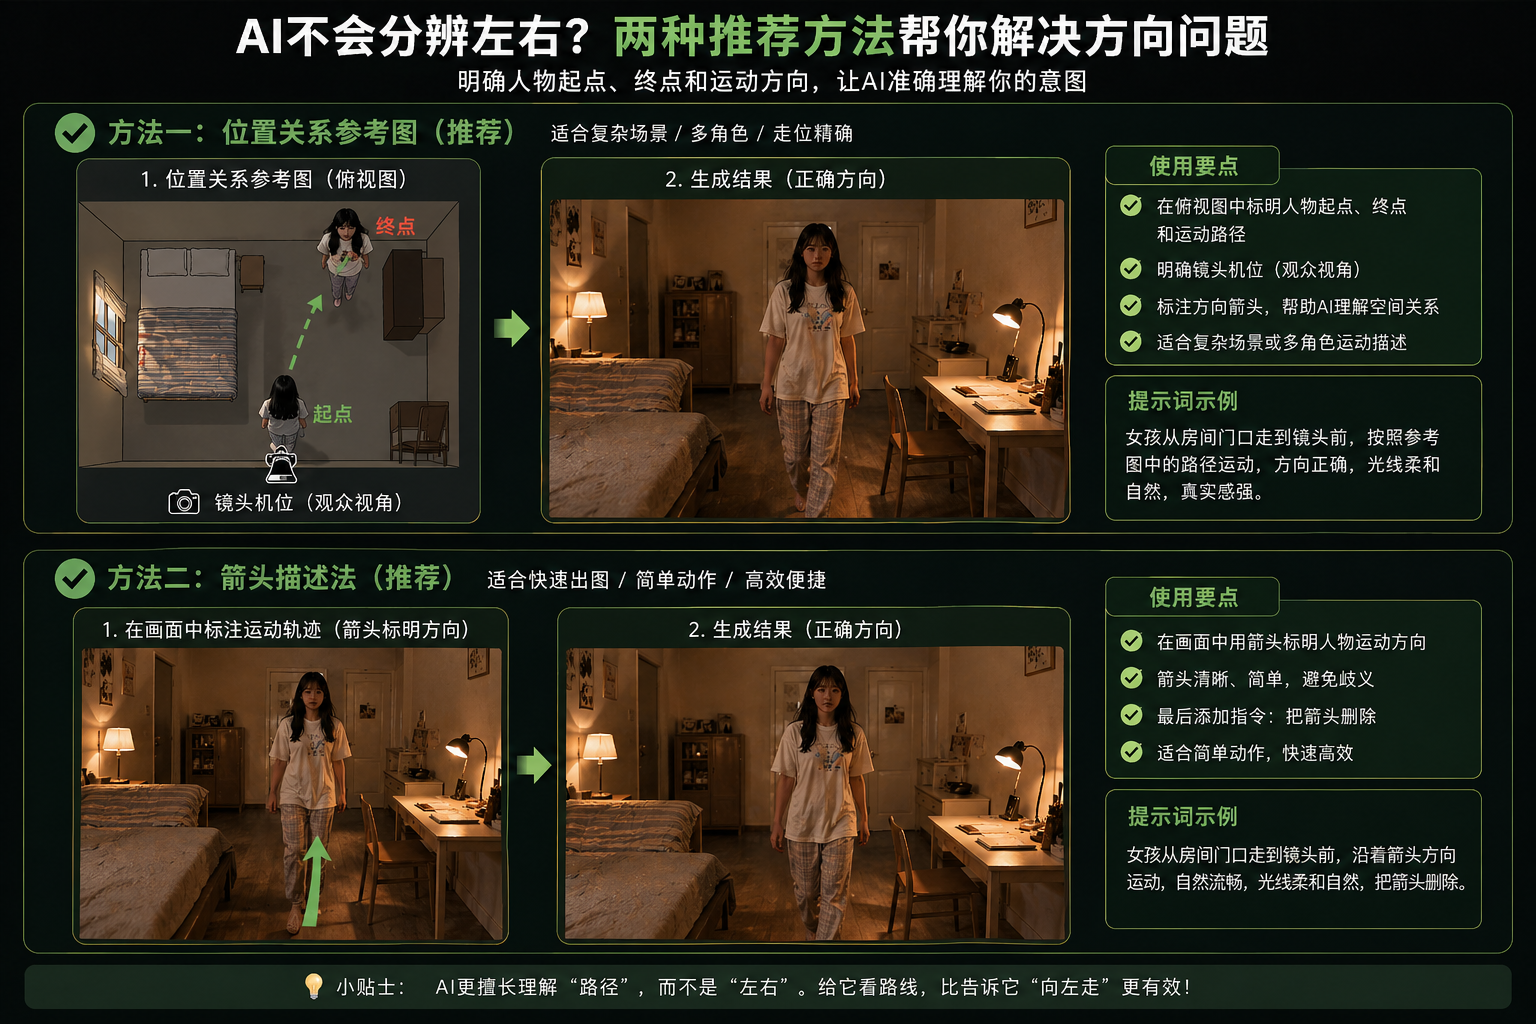
AI lacks spatial awareness and often confuses left and right, needing an additional "position relationship reference image" to inform AI how the characters move, like in the following image. An easier method is to use arrows to describe the character’s movement trajectory and add "delete arrows at the end."
Write slowly and don't rush. The model is much more stable at processing slow movements than fast ones. For fast-paced segments, prioritize using editing speed to achieve this rather than relying on the model to generate quick actions.
Upload reference images for each video segment; don’t just upload once. The model does not have memory between segments; skipping to upload reference images for one segment may result in a shift in the character's appearance.
4. From Segments to Final Piece: Editing Determines the Quality of the Video
Editing and post-production is the pivotal step in the entire process. Each segment generated previously is independent; the tone may differ, the rhythm may be inconsistent, and the audio may also be scattered. The purpose of editing is to amalgamate these fragments into a complete story.
Once the video is accompanied by music, it can better engage the audience's emotions. Adding subtitles makes dialogues clearer; the same footage, when edited well or poorly, can result in vastly different presentations.
The process consists of four steps: arrange materials → unify color tone → add sound → add subtitles, and finally export.
Step One: Arrange Materials
Open Jianying, and drag all segments into the timeline in scene order. Don’t worry about color tone and sound yet; confirm the order, review the overall pace for any issues, and cut off any excess parts from overly long segments in this step.
Step Two: Unify Color Tone
Segments generated at different times may have slight variations in color temperature and brightness, appearing disjointed when placed together. The solution is to select all segments and apply a layer of filter in "Adjustments." Keep the color tone consistent within each scene; use cool blue tones for Scene One and switch to warm yellow for Scene Two.
Step Three: Add Background Music and Sound Effects
Dialogue sound has been handled during video generation. This step mainly covers two types of audio: background music and ambient sound effects.
Background music sets the overall emotional tone, adjusted to stay below 30% of the dialogue volume to avoid overshadowing the voice.
Step Four: Add Subtitles
Use Jianying’s "Smart Subtitles" to automatically recognize dialogues. After recognition, check for typos, unifying font and position. For voiceovers or inner dialogues, differentiate them from normal dialogues using different styles, such as italics or various colors.
5. From Tools to Expression: What AI Videos Really Change
In the previous article "GPT Image 2.0 Enhances Seedance 2.0: Everyone Can Shoot Hollywood Blockbusters", we argued that in the AI era: the barrier to "shooting videos" has been lowered, allowing everyone to produce Hollywood-style blockbusters in the future.
However, a low barrier does not mean that you can produce quality work.
Tools are public, and tutorials are widely available, but most people get stuck in the same place: they have never completed the whole process.
This article has already taken you from a vague idea to step by step editing it into a complete piece.
In the past, this process required a full set of specialized roles: screenwriter, storyboard artist, art director, photographer, editor—each stage posed its own barrier.
Now, these stages have not disappeared; they have just been compressed into a single process.
This signifies a deeper change: video is no longer a product of "production capability," but has begun to turn into a product of "expressive capability."
免责声明:本文章仅代表作者个人观点,不代表本平台的立场和观点。本文章仅供信息分享,不构成对任何人的任何投资建议。用户与作者之间的任何争议,与本平台无关。如网页中刊载的文章或图片涉及侵权,请提供相关的权利证明和身份证明发送邮件到support@aicoin.com,本平台相关工作人员将会进行核查。


