Essential Git Skills for Vibe Coding
Even if AI can handle projects, there are still some skills that are essential to learn. The most fundamental of these is Git.
If you've ever worked on the client side, you've definitely gone through the first version, second version… final version, absolutely no changes version, and then ended up choosing the first version again.
Now, even if AI has become that diligent and patient modifier, you still need to manage various versions, and that is the core function of Git. Simply put, when you Git, you create a new backup of the current code.
Git is an essential skill for programmers; it can also prevent AI from making random changes to the code, create branches, and allows for one-click pushes to GitHub, among other things.
Of course, in the age of AI, most tasks can be handled by AI, but we need to have a basic understanding of it and master its core functions.
──────────────
🛠️ 1. Initial Git Configuration
• Download Git; after downloading from the official website, you can proceed with the default next steps.
• Configure your username and email:
git config --global user.name "Your Name"
git config --global user.email "your.email@example.com"
After configuration, you can check in the terminal:
git -v
git config --list
──────────────
📂 2. Initialize a Project
When running Git for the first time in a project, you need to initialize Git first.
Method 1:
• Open your project folder in Cursor.
• Open the integrated terminal (View > Terminal or Ctrl+`).
• Run the command: git init. This will create a .git folder in the project, initializing the local repository.
• (Optional) Connect to a remote repository (like GitHub): run git remote add origin https://github.com/yourusername/repositoryname.git. If you don't have a remote repository, create one on GitHub first.
Method 2:
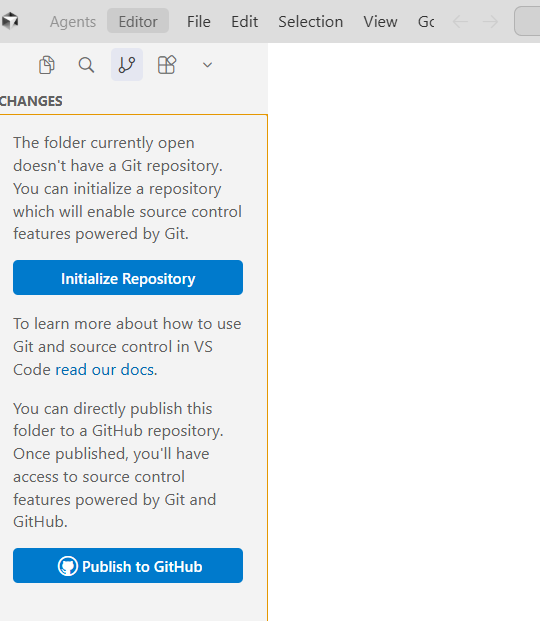
In Cursor, directly select "Initialize Repository" on the Git page.
──────────────
💾 3. GIT Commit Versions and View Version Changes
3.1 Add and Commit Changes (Manage Versions):
After editing the code, click the source control icon (looks like a branch symbol) on the left sidebar of Cursor.
In the Source Control panel, you will see a list of changed files. Click the + icon next to a file to stage the changes, or click the + at the top to stage all.
In the commit message input box, write a description (e.g., "Add login feature"). Cursor's AI feature can help generate messages: click the spark icon (✨) next to the input box, and AI will automatically generate a commit message based on the changes and history (supports Conventional Commits style).
Click the "Commit" button or run git commit -m "message" to commit. This creates a new version.
Repeat this process, committing each small change to maintain atomicity.
When committing for the first time, a prompt will appear; select "Always."
3.2 View Different Versions
Recommended: In the source control graph, you can view saved different versions, along with changes for each file.
To view via command: run git log in the terminal (displays all commit history, including ID, author, and message). Use git log --oneline for a simplified display, or git show to view detailed changes for a specific version.
To view a specific version of a file: right-click the file > Open Timeline, or run git blame <filename> to see the commit source for each line of code.
To compare versions: in the source control panel, select two commits, right-click > Compare Changes to see the differences.
──────────────
⏪ 4. Rollback/Restore
4.1 Undo Uncommitted Changes
• In Cursor, modifications can be restored.
• On the source control page, for changes made since the last commit, click the discard changes next to the file name to revert to the last commit state.
To operate through the Cursor interface:
• Open the left source code management panel (Ctrl+Shift+G).
• In the "Changes" area, find the modified files.
• Right-click the file → select "Discard Changes."
• Or click the undo icon "↶" next to the file.
Through the command panel:
• Press Ctrl+Shift+P to open the command panel.
• Type Git: Discard All Changes to undo all changes.
• Type Git: Discard Changes to undo changes for the selected file.
Through terminal commands:
git restore (undo changes for a single file)
git restore . (undo changes for all files)
git restore /* (undo changes in a specific directory)
4.2 Rollback and Restore Commit History
The staging area is a buffer that allows you to carefully select and prepare the changes to be recorded before committing. Staged Changes
When you commit in Cursor, it automatically adds all files in your "Changes" list to the staging area and immediately executes the commit.
You can obtain the commit ID by right-clicking the version in the source control graph.
(1) Hard Reset (Completely Remove Changes)
⚠️ Warning: A hard reset will permanently delete changes; use with caution.
git reset --hard will completely restore your project folder (including all .py files) to the state of the specified old version and will delete all version records after that.
Through Git Graph:
• Right-click the target commit → "Reset current branch to this commit" → select "Hard."
Through terminal:
git reset --hard
git reset --hard 9fd5c20c1e9d9caa6eebce4edc2bb897e441d181 (hard reset to specified commit)
git reset --hard HEAD~1 (hard reset to the previous commit)
(2) Using Revert (Recommended for Pushed Commits)
Revert does not delete history; instead, it creates a new commit that exactly negates the changes of a previous commit.
git revert (create a reverse commit to undo changes)
git revert HEAD (undo the most recent commit)
git revert .. (undo a series of commits)
(3) Soft Reset (Keep Changes in Working Directory)
Reset to the previous or specified commit, but keep the modified content unchanged.
Its core function is to move the repository pointer (HEAD) to the specified old version without changing the code you've already written (working directory) and the content already added to the staging area. In simple terms, it undoes the commit.
Used for too many commits, merging multiple messy commits.
Using the Git Graph extension:
Install the "Git Graph" extension.
Click the "Git Graph" button in the source code management panel.
Right-click the target commit → select "Reset current branch to this commit."
Select "Soft" mode.
Through terminal:
git reset --soft
git reset --soft HEAD~1 (soft reset to the previous commit)
(4) Mixed Reset (Keep Changes but Unstage)
git reset (mixed reset, default mode)
git reset HEAD~1 (reset to the previous commit)
4.3 Branch-Level Rollback and Restore
Restoring after Deleting a Local Branch
git reflog (view references of deleted branches)
git branch (restore deleted branches)
Restoring after Forced Push
git reflog show origin/ (view remote reference log)
git reset --hard (restore to previous state)
git push --force-with-lease
──────────────
🌿 5. Branches
Branches in Git are extremely lightweight and inexpensive operations, so feel free to create a branch for every new task, new idea, or new bug fix. This is the essential path to efficient and safe development.
By default, when a Git repository is initialized, there is a main branch, usually named main.
The role and advantages of branches:
• Parallel Development: Different features/fixes are independent and do not interfere with each other.
• Experiment Isolation: Try new solutions without affecting stable code.
• Code Review and Release: Merge into the main branch through PR/MR, triggering CI/CD.
• Rollback and Tracking: The commit history of each branch is clear, making it easy to locate and rollback.
Technically, a branch is not a complete copy of a project folder; that would waste space. A branch is essentially a lightweight, movable pointer that points to a specific "commit."
• The main branch is a pointer that usually points to the latest, most stable commit of the project.
• When you create a new branch, you are simply creating a new pointer that points to the same place as your current commit pointer.
View Branches: Cursor's bottom right corner shows the branch.
git branch (view all local branches; the current branch will be marked with *)
git branch -a (view all branches, including remote branches)
Create Branch: Cursor's bottom right corner shows the branch.
2.1 Create a Branch from the Current Point
git branch feature-payment (create a new branch named feature-payment, but remain on the current branch)
git checkout -b feature-payment (✨ Strongly recommended: create and immediately switch to the new branch in one step)
2.2 How to Create a Second Branch from a Specific Point?
This is used to create several different branch directions. Suppose you are currently on another branch but want to start new work from the latest state of main:
git checkout -b test2 main
Using Commit ID (hash value): the most precise way.
git checkout -b test3 87be5a4304950ba71c375fdb785e44d3ac2dc7c7
Switching Branches: In Cursor, use the command
git switch test2
(This is the updated, more recommended command because its semantics are clearer and is used only for switching.)
Working on the Branch: After switching to the branch, all your git add and git commit operations will only affect the current branch.
(On the feature-payment branch)
…write code…
git add .
git commit -m "feat: add payment processing logic"
Merging Branches: Once you have completed development on the branch, you need to merge the results back into the main line.
- First, switch back to your target branch (usually main):
git switch main
- Pull the latest code from the remote to ensure your main branch is up to date (a good habit):
git pull
- Execute the merge command to merge the changes from the feature-payment branch:
git merge feature-payment
Method 2:
• Switch to the target branch.
• Source control > “…” > “Branch” > “Merge” and select the source branch.
About Merge Conflicts: If Git finds that you have made different modifications to the same line of code in the same file on both the main branch and the feature-payment branch during the merge, it will not know which one to keep, resulting in a "conflict." You need to manually open that file, resolve the conflict (decide which code to keep), and then add and commit to complete the merge.
Deleting Branches: After merging the branch, it can usually be deleted to keep the repository tidy.
git branch -d feature-payment
(Deletes a local branch that has already been merged; -d is a shorthand for --delete, which is relatively safe.)
git branch -D failed-experiment-branch
(If the branch has not been merged but you are sure you want to force delete it, such as a failed experiment, use -D.)
Collaborating with Remote Repositories:
git push -u origin feature-payment
(Push your new branch to the remote repository, such as GitHub, so others can see it.)
git push origin --delete feature-payment
(Delete the branch on the remote repository, usually done after merging into main and pushing to remote.)
──────────────
☁️ 6. GitHub Remote
6.1 First Operation on the Repository
Initial Setup: Associate your local project with a GitHub repository.
Create a new repository on the GitHub website: • Open the GitHub homepage and log in to your account. • Click the + sign in the upper right corner and select New repository. • Give the repository a name (usually the same as your project folder name). • Do not check "Add a README file," "Add .gitignore," or "Choose a license," as we already have those locally. • Click "Create repository."
Local Association: After creating the repository, GitHub will display a page with several lines of commands. Find the section titled "…or push an existing repository from the command line" and copy the commands there. It usually looks like this:
echo "# test2" >> README.md
git init
git commit -m "first commit"
git branch -M main
git remote add origin https://github.com/ishicm/test2.git
git push -u origin main
Method Two:
In source control, there is a push option. The first time you push, it will prompt you to associate the relevant content; just enter the repository link, such as https://github.com/ishicm/test2.git.
The process of going from an existing GitHub repository to local is simpler.
(1) Copy the repository address on GitHub:
• Open the GitHub repository page you want to sync.
• Click the green <> Code button.
• Copy the HTTPS or SSH address.
(2) Clone the repository in Cursor:
Method One (through the welcome page): Open a new Cursor window, select clone directly on the welcome page, and paste the address you copied.
Method Two (through the command panel): Cursor will automatically download the entire project to your computer. Now, the local and remote are already associated.
6.2 Second and Subsequent Operations on the Repository
Push:
Commit
Push. Method One: In Cursor's source control, there are multiple places to sync, including sync changes that appear after committing. Method Two: In the terminal, type git push.
Pull:
In Cursor's source control, there is a direct update button in the lower left corner.
Then it divides into two situations:
Situation 1: If there have been no changes in the local position, it will directly download the latest version.
Situation 2: If there are code changes locally, there may be conflicts (ps: look up information when encountering this).
免责声明:本文章仅代表作者个人观点,不代表本平台的立场和观点。本文章仅供信息分享,不构成对任何人的任何投资建议。用户与作者之间的任何争议,与本平台无关。如网页中刊载的文章或图片涉及侵权,请提供相关的权利证明和身份证明发送邮件到support@aicoin.com,本平台相关工作人员将会进行核查。


