介绍
在上一篇文章中,我写了关于使用Eclipse从Java调用部署了区块链的智能合约的信息。 本教程将展示如何直接从Android开发环境-Android Studio中调用智能合约。
区块链研究实验室|使用Java与区块链智能合约进行交互
环境要求
我们将使用Tezos区块链。为了使我们的Android java代码与现有的、部署的智能合约交互,我们需要使用TezosRio的TeZOSJ库。这个库有两个版本,一个是专门为使用EclipseIDE制作的通用Java应用程序编写的(TezosjPlainJava),另一个是用于Android应用程序开发的(TezosjSDK),我们将在这里使用它。我们不需要下载整个库的源代码。我们只需在build.gradle文件的dependencies部分插入一行代码,就可以了。作为我们的开发IDE,Android工作室将是我们的选择。
目标
我们要调用的智能合约是一个简单的客户基础注册,可以在以下地址的Tezos testnet上找到部署:KT18pK2MGrnTZqyTafUe1sWp2ubJ75eYT86t
您可以通过Tezblock之类的Tezos区块浏览器之一轻松查看智能合约的详细信息,或通过使用Better-call.dev工具。不过另一种选择是检查与SmartPy区块浏览器浏览智能合约。记住要指定一个testnet https://tezos-dev.cryptonomic-infra.tech.
我们的智能合约称为“客户”,它具有四个入口点(或方法):addCustomer,removeCustomer,transfer和updateBalance。 基本上,插入,删除,转移资金和更新。没什么好看的。 这是仅为教育目的而创建的。它的作用是在Tezos区块链的存储中维护一个“客户”列表。
智能合约调用
TezosJ可能是当今调用Tezos智能合约的最简单方法之一。 基本上,我们的调用可以通过一个命令完成:
JSONObject jsonObject = wallet.callContractEntryPoint(
wallet.getPublicKeyHash(), "KT18pK2MGrnTZqyTafUe1sWp2ubJ75eYT86t",
amount, fee, "", "", "addCustomer",
new String[]{"1000000", "123456789","Bob","98769985"});
上面的代码将一个新客户Bob的余额加为10ꜩ,其ID为123456789,电话号码为98769985。 这是通过调用callContractEntryPoint方法完成的,该方法基本上需要与普通的Tezos .send()方法相同的参数,但有一些额外的参数:ContractEntryPoint名称,以及一个包含预期entrypoint参数的字符串数组(在进行调用之前应该知道这些参数)。
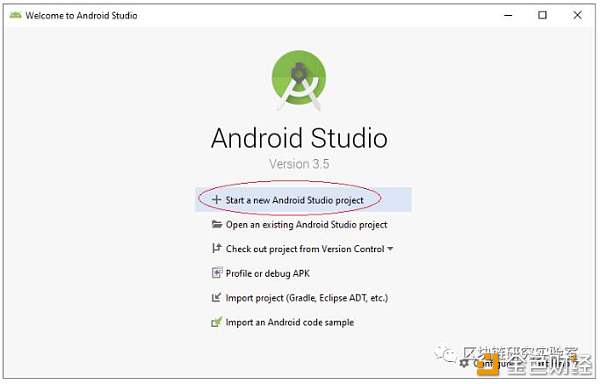
如果您还没有完成,请下载并安装Android Studio。打开它,第一步是创建一个新的Android Studio项目,如下所示:
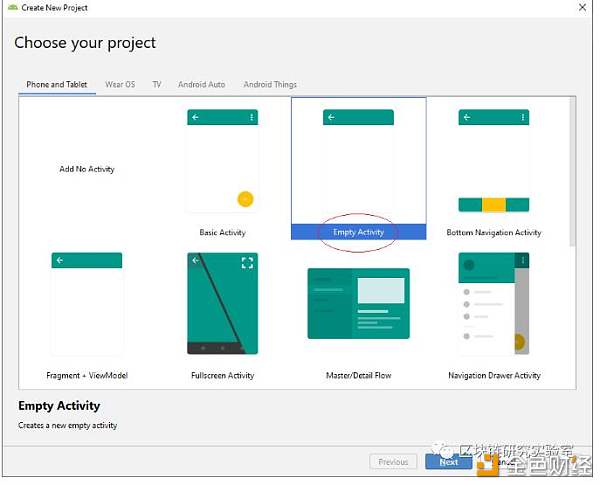
选择手机和平板电脑作为您的项目类型,然后单击Empty Activity:
将项目命名为smartContractCall并将Language更改为Java。然后,单击完成:

我们要做的第一件事是从AndroidManifest.xml文件中的application标记中删除android:allowBackup =“ true”。这很关键,如果我们跳过这一步,TezosJ_SDK将不起作用:

现在是时候将TezosJ_SDK添加到我们的项目中了。打开您的build.gradle(Module: app)文件。转到依赖项部分,然后添加:实现‘com.milfont.tezos:tezosj_android:0.9.998’。 然后,单击立即同步(在窗口的右上角):
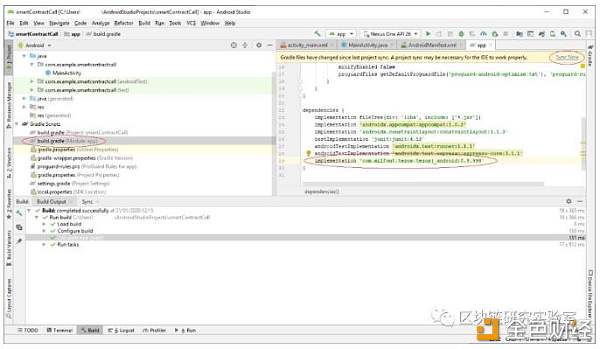
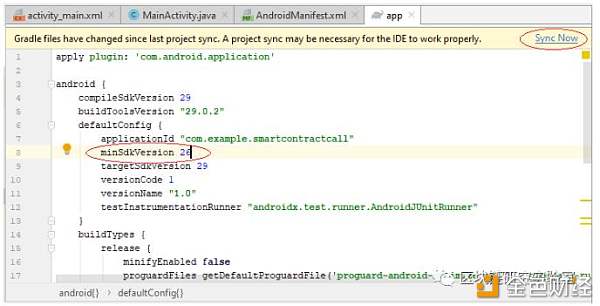
关于配置,我们差不多完成了。最后一步是在同一文件中将minSdkVersion更改为26。然后,再次同步:
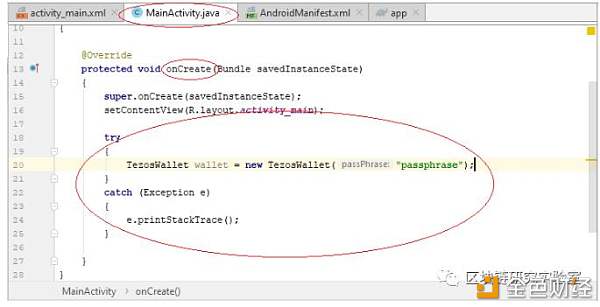
全做完了! 现在我们已经准备好一切,让我们首先构建一个Tezos钱包。 在MainActivity文件的onCreate方法上,放置一个如下所示的声明(不要忘记try-catch块):
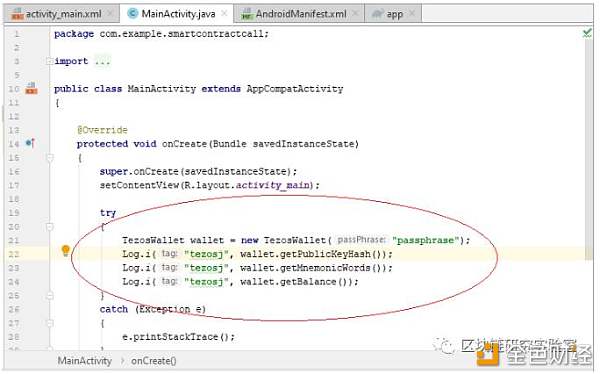
现在添加一些Logcat输出,以检查是否成功创建了我们的钱包。 我们将打印有关此信息:钱包的公钥哈希(Tezos地址),其助记词和当前余额:
添加Log.i()命令后,运行该项目,您将获得如下内容(check Logcat):

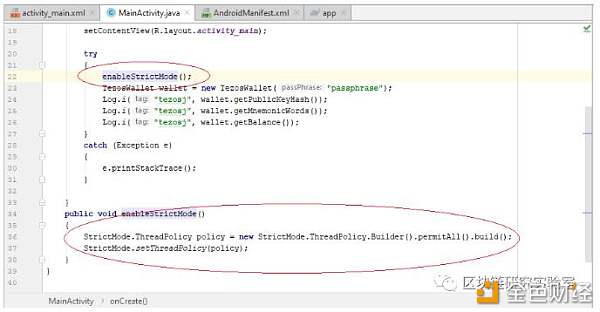
我们能够生成一个新的钱包并得到其助记符。但是尝试从区块链获取钱包余额时出现错误。这是因为我们试图直接通过MainActivity类访问Internet,而在Android环境中则禁止此类。对于本教程,让我们使用一个小的解决方法。将下面的方法放入您的MainActivity类中:
public void enableStrictMode()
{
StrictMode.ThreadPolicy policy = new
StrictMode.ThreadPolicy.Builder().permitAll().build();
StrictMode.setThreadPolicy(policy);
}
并从onCreate方法调用它:
enableStrictMode();
此处使用严格模式仅出于说明目的。 不建议直接通过MainActivity类访问Internet(在新线程中进行操作):
再次运行该项目,现在它将正常运行,并且您将能够正确查看Logcat上的钱包余额:

现在我们有了一个功能正常的Tezos钱包,并且可以调用客户Tezos智能合约了。
我们将使用SmartPy.io在线IDE在Tezos区块链测试网上创建并部署了我们将要使用的客户智能合约。检查下面的智能合约源代码:
# Imports the SmartPy library.
import smartpy as sp# Defines the Customer class and its constructor.
class Customer(sp.Contract):
def __init__(self):
self.init(customers = sp.map())
# Defines the addCustomer entry point.
@sp.entry_point
def addCustomer(self, params):
# Verifies if mandatory fields have values.
sp.verify(params.id != "")
sp.verify(params.name != "")
sp.verify(params.phoneNumber > 0)
# Declare the parameter types.
sp.set_type(params.id, sp.TString)
sp.set_type(params.name, sp.TString)
sp.set_type(params.phoneNumber, sp.TNat)
sp.set_type(params.balance, sp.TMutez)
# Defines a customer record, so we can add to a Map.
customer = sp.record(name=params.name, phoneNumber=params.phoneNumber, balance=params.balance)
# Adds the new customer record to a Map (that will reside in the contract's storage).
self.data.customers[params.id] = customer
# Defines the removeCustomer entry point.
@sp.entry_point
def removeCustomer(self, params):
# Verifies if mandatory fields have values.
sp.verify(params.id != "")
# Declare the parameter types.
sp.set_type(params.id, sp.TString)
# Remove the customer from the Map.
del self.data.customers[params.id]
# Defines the updateBalance entry point.
@sp.entry_point
def updateBalance(self, params):
# Verifies if mandatory fields have values.
sp.verify(params.id != "")
# Declare the parameter types.
sp.set_type(params.id, sp.TString)
sp.set_type(params.amount, sp.TMutez)
# Updates the balance.
self.data.customers[params.id].balance = params.amount
# Defines the transfer entry point.
@sp.entry_point
def transfer(self, params):
# Verifies if mandatory fields have values.
sp.verify(params.idFrom != "")
sp.verify(params.idTo != "")
sp.verify(params.amount > sp.mutez(0) )
# Verifies if customer has enough funds to be transfered.
sp.verify(params.amount <= self.data.customers[params.idFrom].balance )
# Declare the parameter types.
sp.set_type(params.idFrom, sp.TString)
sp.set_type(params.idTo, sp.TString)
sp.set_type(params.amount, sp.TMutez)
# Updates the balance.
self.data.customers[params.idFrom].balance = self.data.customers[params.idFrom].balance - params.amount
self.data.customers[params.idTo].balance = self.data.customers[params.idTo].balance + params.amount
# Creates the test scenario, to simulate a contract call in SmartPy.io IDE.
@sp.add_test(name = "Customers")
def test():
# Instantiate a contract inherited from the Customer Class.
myCustomersContract = Customer()
# Defines a test scenario.
scenario = sp.test_scenario()
# Adds the contract to the test scenario.
scenario += myCustomersContract
# Inserts the customers, calling the contract's addCustomer entry point.
# This customers will reside in the contract's storage.
scenario += myCustomersContract.addCustomer(id="123456",name="Daniel",phoneNumber=99984537,balance=sp.mutez(0))
scenario += myCustomersContract.addCustomer(id="345678",name="Eleonor",phoneNumber=85375677,balance=sp.mutez(0))
scenario += myCustomersContract.addCustomer(id="678905",name="Fabian",phoneNumber=78655567,balance=sp.mutez(0))
# Removes a customer through its id number.
scenario += myCustomersContract.removeCustomer(id="678905")
# Updates a customer's balance.
scenario += myCustomersContract.updateBalance(id="123456",amount=sp.mutez(10000000))
# Transfers funds from a customer to another.
scenario += myCustomersContract.transfer(idFrom="123456", idTo="345678", amount=sp.mutez(5000000))
此处显示的SmartPy智能合约的源代码仅用于说明目的,我们不需要再次编译和部署它。它已经位于Tezos区块链测试网上,地址为:KT18pK2MGrnTZqyTafUe1sWp2ubJ75eYT86t
现在我们拥有从Android调用智能合约所需的一切。 首先,我们将使用智能合约的“ addCustomer”入口点添加新客户。让我们考虑客户的名字“ Bob”,他的ID将是“ 98765”,电话号码是“ 99876787”。 鲍勃的余额为10英镑(1000万个互斥量)。 因此,我们的智能合约调用命令将如下所示:
JSONObject jsonObject = wallet.callContractEntryPoint(
wallet.getPublicKeyHash(), "KT18pK2MGrnTZqyTafUe1sWp2ubJ75eYT86t",
amount, fee, "", "", "addCustomer", new String[]{
"1000000", "98765","Bob","99876787"});
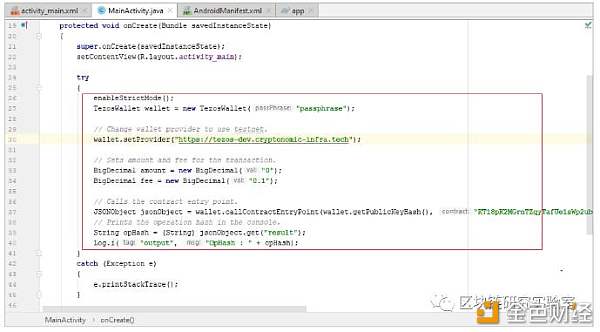
首先,我们需要通知TezosJ,我们将使用Tezos测试网(实际发布智能合约的地方)。我们还需要设置交易金额和费用。这是通过以下Java代码完成的:
// Change wallet provider to use testnet.
wallet.setProvider(“https://tezos-dev.cryptonomic-infra.tech");
// Sets amount and fee for the transaction.
BigDecimal amount = new BigDecimal(“0”);
BigDecimal fee = new BigDecimal(“0.1”);
// Calls the contract entry point.
JSONObject jsonObject = wallet.callContractEntryPoint(
wallet.getPublicKeyHash(), “KT18pK2MGrnTZqyTafUe1sWp2ubJ75eYT86t”,
amount, fee, “”, “”, “addCustomer”, new String[]{
“1000000”, “98765”,”Bob”,”99876787"});
// Prints the operation hash in the console.
String opHash = (String) jsonObject.get("result");
Log.i("output", "OpHash : " + opHash);
复制代码并将其粘贴到我们的MainActivity类中,使其保持如下所示:
请注意,要使此调用正常工作,您首先需要注资并显示您的Tezos帐户。否则,您可能会收到如下错误:
There were errors: kind ‘branch’ id ‘proto.005-PsBabyM1.implicit.empty_implicit_contract’
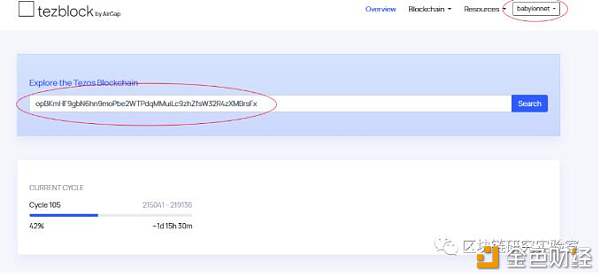
运行项目! 如果一切正常,您将得到LogCat中显示的事务哈希(此处为onuvzSRu9GiUBtPxEVf958jPUkG8NTxo7UHCYvFXKB8Chtci3Jm):

这表明我们已成功将callContract事务发送到Tezos testnet区块链(因为我们有一个操作哈希)。 现在让我们检查交易是否被Tezos区块链接受。我们将使用TezBlock资源管理器执行此操作。在您喜欢的浏览器中打开https://tezblock.io,首先,在屏幕的右上角,将“ mainnet”更改为“ balylonnet”(与testnet相同)。 然后将我们从Java执行中获得的操作哈希值粘贴到搜索框中,然后按“ enter”键:
这将显示我们智能合约的结果以及操作细节。通过单击“display”,您将能够检查从我们的Java代码传递到Tezos区块链的参数:
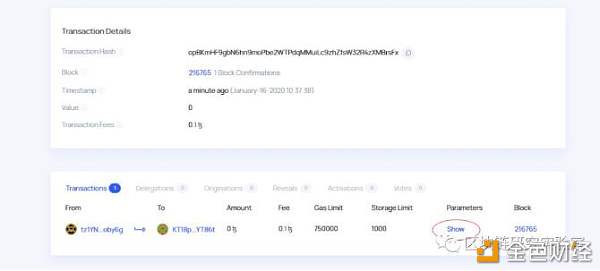
参数:
Left (Left (Left (Pair (Pair (Pair 1000000 "98765") "Bob") 99876787)))
这是我们从Android应用程序调用生成的Micheline格式的参数。部署时,Tezos智能合约以Michelson语言编写,它们期望以这种格式发送的输入参数。使用TezosJ库的好处之一是它可以实时生成Micheline格式的参数,而您不必担心它是如何完成的。
大结局
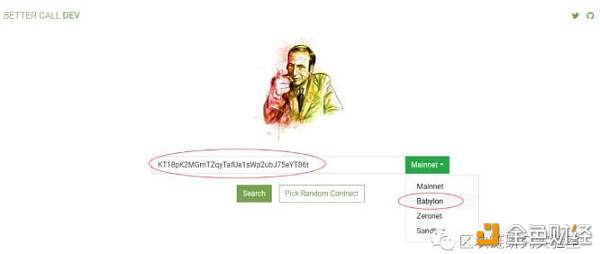
到目前为止,我们可以确保正确调用了智能合约,传递了参数并且操作已被Tezos区块链接受。 现在我们要做的最后一件事是检查是否将新客户Bob插入了智能合约的存储中。 为此,我们将使用Better-call.dev工具。只需打开浏览器并将其指向https://better-call.dev。 在搜索字段中输入我们的客户智能合约的地址(KT18pK2MGrnTZqyTafUe1sWp2ubJ75eYT86t),将网络更改为babylonnet,然后按Enter:
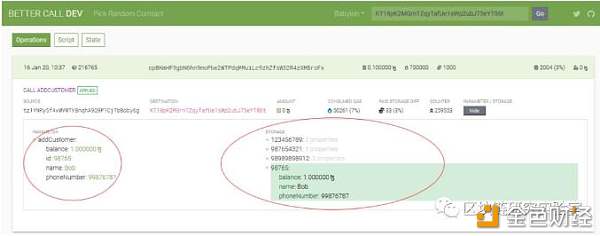
结果将是曾经发送到智能合约地址的所有操作的列表,以及智能合约存储的当前状态。您将在此处检查从Java传递过来的参数,以及它们是否正确保存在存储器中:
您可以尝试智能合约的其他入口点,例如removeCustomer,transfer和updateBalance。切记始终检查每个入口点所需的参数数量。
运行代码时,如果遇到Java错误,则表示未发送事务。在这种情况下,您必须重新检查参数,其顺序,帐户余额,费用以及您正在使用的网络(主网或测试网)。此外,还要检查gasLimit和storageLimit参数。
另一方面,如果您曾经获得过操作哈希,则意味着您的Android应用已成功将交易发送到了区块链。但是您还必须检查可能的与区块链相关的错误。在这种情况下,当您使用TezBlock Explorer进行检查时,它将显示带有鲑鱼色背景的错误,这意味着在区块链上下文中发生了错误(例如传递的参数数量错误,参数Micheline格式错误,甚至智能合约未接受的条件-例如:您调用了转移入口点,但“发件人”客户没有足够的资金可发送)。
结论
开发人员使用区块链智能合约从未如此简单。 特别是Tezos,提供了许多出色的工具和无数的计算机语言库,可促进与大多数系统的集成。TezosJ库通过提供一种易于使用的callContractEntryPoint方法进行创新,该方法可以即时创建Micheline格式的参数。它具有Android开发人员在与区块链无缝交互的应用程序开发中蓬勃发展所需的所有工具。
转载自深圳热线
免责声明:本文章仅代表作者个人观点,不代表本平台的立场和观点。本文章仅供信息分享,不构成对任何人的任何投资建议。用户与作者之间的任何争议,与本平台无关。如网页中刊载的文章或图片涉及侵权,请提供相关的权利证明和身份证明发送邮件到support@aicoin.com,本平台相关工作人员将会进行核查。